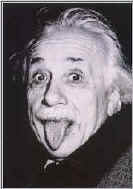
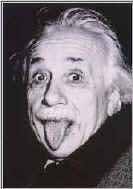
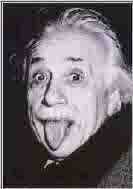
 High-10KB
Photoshop Tutorial 2: Web-Ready Images
 High-10KB
 Medium-9KB
 Low-7KB
Photoshop Tutorial 2: Web-Ready Images
Getting Your Work Digitized
Scanning existing images from catalogs or color printouts.
You will notice that the scanner will pick up the dot patterns and moires.
Before resizing the image you can attempt to get rid of the dots.
Use Filters:
-Despeckle
-Dust and Scratch
-Unsharp Mask
The best technique is to apply a Gaussian Blur. Don’t completely blur the image but get rid of the printing dots. Find this middle ground. The resulting image will be slightly blurred. Resize the image smaller and apply a sharpening filter. This final image should be reasonably acceptable.
Touching Up Images
Use Filters!These apply image algorithms that will consistently adjust your entire image.
Noise Filters: Despeckle / Dust & Scratches
A scan or digital photo may pick up specks or fragments that detract from the quality of your image. These filters will find these inconsistencies and remove them. The Dust & Scratches will allow you to adjust the radius of pixels effected and the threshold to which you apply the filter. The preview window will allow you to see the degree of effect.
Sharpen Filters: Sharpen Edges / Sharpen More
A scan or digital photo may be slightly blurred. This can especially be seen on crisp line drawings or images with hard edges. Sharpen Filters will find these edges and remove the blur.
Be careful, you can use too much of the filter and begin to lose information that gives the image its character. Apply this filter sparingly.
Image / Adjust /
Auto Levels and Auto Contrast will apply an algorithm which will try to return you image to its original color / contrast state. I have found that these rarely work satisfactorily, but are sometimes worth a try.
An image with text can be made crisper by slightly self-adjusting the Brightness / Contrast.
Rubber-Stamp Tool
For particular inconsistencies in your image, a helpful tool is the rubber-stamp tool.
This allows you to spot-touch up within an area by replicating the image quality of an adjacent area.
GIF vs. JPEG vs. PNG
The decision of file type should be made on the type of image you are digitizing.
GIF files will work best for flat-color style illustrations. Gradients will turn out blotchy.
(example image)
JPEG’s will always yield the smallest and best-looking graphics if the image includes gradients or soft-focus. Digital photos, and scans with gradients. With photo quality images, JPEG’s are your friends!
PNG compression does not throw away any image info in its compression because it actually decompresses when viewed. It’s like an automatic WinZip for images. This compressed file is still larger than a comparable JPEG image. Image quality will be very similar. For all low-resolution imagery you should still use JPEG over PNG.
As a note, PNG does support alpha channels. If you understand alpha channels you might foresee some rare need to use PNG.