On the Menu:
-Boolean Operations
-C-Meshes
-Materials
-Lighting
Boolean Operations:

First note the Tool Options dialog box. This can be set to determine the resulting status of your original objects after performing the Boolean operation.
-Union: Creates a singular object entity out of two or more separate solids
-Intersection: Creates a single object that is the resultant of the intersecting mass of two overlapping objects.
-Difference: Subtracts the overlapped mass of one object from another.
-B-Split: Creates multiple difference objects from the intersection of two overlapping objects.
***Boolean operations are tricky! Your original objects must be made accurately and should be placed in accurate relation to one another for a successful Boolean. For example, if you intend to Union two objects and they are not touching they will not Union. Be precise!
C-Meshes:

or Controlled Meshes
are the best way to create a fabric like object. These are fun, but complicated.
The lines you use to generate the mesh must be in a different 3-D relationship.
The best approach is to create the lines as a surface object and then move them in perpendicularly in the third dimension to create depth.
You can modify the controlled mesh you have created by clicking on the object while in the C-Mesh command. Grip points will be given and you can push and pull the mesh. Experiment!
Also notice all of the options in the dialog box. This command has a lot of potential applications.
Materials:
Start to notice the subtle variations in the materials around you. Look at how real materials have a degree of imperfection in them. Subtlety creates a sexy model. Let me explain. Unless you have an idea that you want your model to look like a Looney Tunes cartoon (which could be a possibility), material settings should be made with delicate care. Slight variations in surface difference or surface texture will create a more realistic rendering.

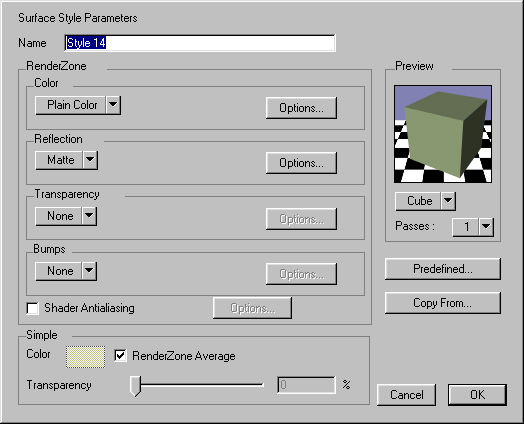
Mist! Under the Color selection menu. Try and utilize the mist surface property as often as possible. It makes really good natural looking surfaces. By using 2 very slightly different colors you get a subtle but noticeable difference that really helps. Another use for mist is to add subtle differences in specularity and reflectivity to surfaces. This also helps break-up the surface in the way that microscopic blemishes do in the real world.
Simple Color:
This is the color of the wire frame or hidden line model. If your material color is dark you should see the lines clearly. If however you have a light colored material you might not be able to see the lines against the white modeling space background. You can change it to a darker color, but when you render the material will be the desired color.
Predefined Materials:
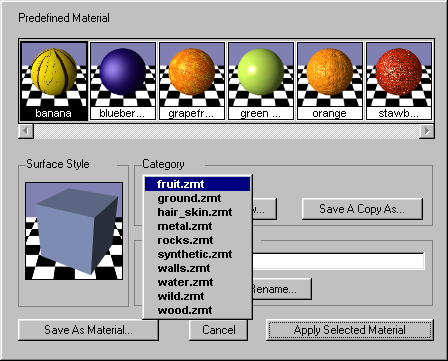
You can begin with some of the Predefined Materials. BUT, you should tweak some of the settings within these. They are too perfect as they are. Add some digital dirt. Misuse the predefined material for some other application. Be creative!

Use the Preview command to get an idea of how your material will render on a flat or curved surfaces.
Lighting

-Lighting is one of the most tricky conditions to create within a computer model. Begin to notice the quality of light around you. Shadow edges, ambient lighting, material reflectivity, and so on. You can control all of this in Form Z but it takes LOTS of patience and practice.
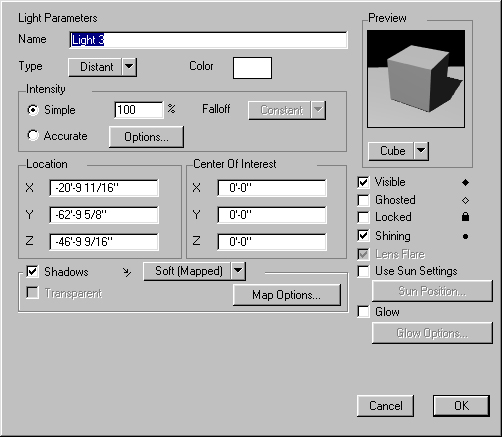
-To create a new light, double click in the Light Palette. You can see the position and direction of the light by turning on the diamond shaped icon.
Think like a movie director when you place your lights. What is the best angle that you are going to show your model at. Place the lighting correspondingly.
Note all of the different types of lighting available:
Distant: Like the sun. All light rays are parallel and equal in intensity.
Point Light: A glowing sphere that emits light in all directions.
Cone: Like a spotlight that can be focused.
Projector: You can use and image and project it like a slide projector. This setting likes to use a lot of memory. Be cautious!
Area: You define a 2-D Surface and it becomes a source of light.
Custom: You figure it out.
Line: Like an Area light but uses a single line segment. This is a new option. Try it out before I do.
Once again, subtlety goes a long way in lighting. If you decide to color a light, just add a slight tint. When you render, it will be more effective!