Detailed Final Cut Pro Setup Instructions…please read, it will save yo’ ass later.
On to the fun...
Before you begin ripping away at Final Cut, there are a few preparatory things you should take care of:

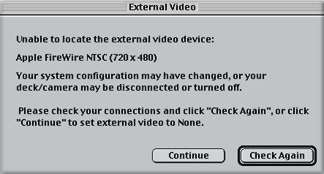
1. Make sure DV Deck/Camera is powered on. If not used for a while, it may power down into a sleep mode. When you start up FCP, you may get this message. If you do, chances are that the deck is not powered on. To see what you are doing in FCP, you need this deck/camera and an NTSC monitor (connected to your deck/camera using the analog outputs (RCA or y/c cables) switched on. This is also how you will be outputting other tape formats (VHS, HI8, SVHS, even Beta), should you wish to do so. Simply connect the destination deck between the DV deck/camera and the NTSC monitor.
2. To monitor audio, simply patch audio out of your deck/camera to the NTSC monitor. At some times you may also get audio from the Mac speakers. If it bothers you, you can disable it in preferences (later). If not ignore it. If you are sending Video out to the Firewire connection to monitor, the audio goes out to Firewire as well.
A note on configuring drives:
It's really much less complicated than folks tend to think. The video footage on your DV tape isn't like VHS video. It's a digital file. So when you capture it, you're just transferring the file from the tape to the drive. That's why we call it LOSSLESS, because it's an exact copy of the file on the tape. Why is this important? Because when you play a clip in the FCP timeline (more later), the video file has to be read from a hard drive quickly, unlike physical tape which crosses a tape head at real-time.
Now for common FCP usage, there are two kinds of DV files; files you captured using the Firewire from deck/camera and files you create every time you render anything, i.e. transitions, filters, etc. The former are called (and go into) "Capture" and the latter are called (and go into) "Render". Audio and Video captured from Firewire are considered one file. Anything rendered is also a file.
Start up the whole system
1. When the Mac is finished booting, you will be looking at the desktop. To start FCP, double click on the Final Cut Pro Icon.

When you start FCP, it will always open the last project that was open on the machine, or an untitled project if this is your first time or you have thrown out the preferences. Chances are when FCP is finished loading, there will be a project open and it may not be the project you want to work on. If not, just go the File Menu and select Close Project. You can really screw up your life by not keeping your eye on the ball, because if you just begin working and save, you may change someone else's work. Also remember that more than one project can be open at a time. If you don't want to work with a project that opens at start up, close it or you may accidentally change and save it later.

2. When FCP is completely loaded, several windows should open up. More than likely, a previous project will be open up as well, so immediately close any other project that may have opened, by going to the File menu and selecting Close Project. When there is no longer any project showing in the browser window (only the effects tab), you must set your Preferences. Unlike many applications, where you can happily work without ever altering the default preferences, FCP needs you to set the preferences correctly in order to work. FCP also has the annoying (or convenient, depending on your workstation needs) tendency to retain the preferences from the last project that was opened. This means that even if you have the right project open, FCP could do the wrong things to it. Although FCP 2.0 has included some enhancements that make preferences and A/V settings easier, you must still make the correct settings or FCP will not work right.
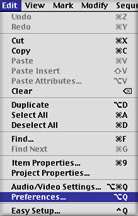
EVERYTIME you start to work, go to Preferences and check to make sure that they are set the way that you want them. To do this, first go to Preferences in the Edit menu.

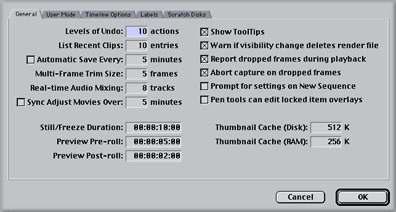
A window will come up that is divided into 5 tabs along the top. These are your Application Preferences. You must visit each of them, although it is conceivable that you may never have to change any of them. Just do it to make sure until you have it down cold, OK ? 99% of FCP problems are settings-related.

The first tab is for General Settings. You may want to disable AutoSave, as there have been rare reports of corrupted files. Be safe and manually save all the time. If you are using a Canon camera other than the GL-1, you may need to enable the Sync Adjust Movies to compensate for an audio sync issue related to those cameras. IMPORTANT: DO NOT ENABLE THE SYNC ADJUST MOVIES IF YOU BELIEVE THERE ARE TIMECODE BREAKS ON YOUR DV TAPES. The default setting for Sync Adjust Movies is on. It should be turned off if you are using anything other than Canon cameras, excepting of course the GL-1. Leave "Report Playback Drops" and "Abort Capture Drops" enabled. This will be the only way you know you are dropping frames. If your system is dropping frames, you need to know this so that you can fix the problem. DROPPED FRAMES ARE NOT ACCEPTABLE!!! Disabling them is like taking the batteries out of a smoke alarm. Be careful with the other settings on this tab and reference them in the Manual and FCP QuickStart Guide where they are explained in-depth

The second tab is for User Mode. The User Modes limit some of the features available to the project and leave a workstation that is easier to use for the simpler tasks of field logging and rough cutting. For the time being, select Standard.
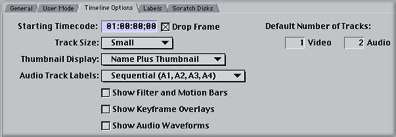
The third tab is for Timeline Settings. This preference allows you to customize certain features of the sequence timeline. You also have the option of having the timeline start with a time value other than 01:00:00:00, which can be a useful function in certain circumstances when using the Editing to Tape function.

The fourth tab is for assigning color values for status indicators in the timeline. This is less critical, but you can customize these when it becomes necessary.
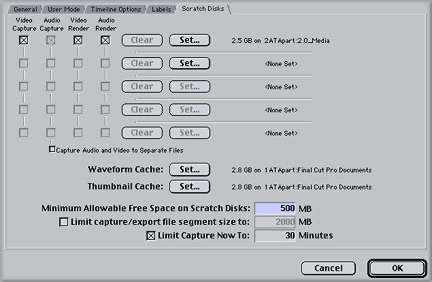
The fifth tab is absolutely critical. It is called the Scratch Disk settings and it is where you tell FCP where you want to save those enormous Capture and Render Files we were just discussing above. No matter how streamlined FCP makes the process of starting a project, this Scratch Disk Preference will always remain a critical responsibility of the user. You will not take it seriously until you lose a lot of files one day and have to completely redo a finished project.

To correctly set your Scratch Disk Preferences:
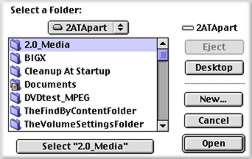
Click Set on the topmost of the five Clear/Set combination lines. You will receive a dialog box asking you to select the appropriate folder/drive. Navigate the dialog box until you are looking at the desktop, then double click your Capture/Render drive.

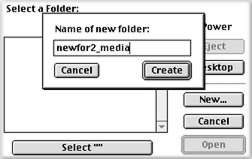
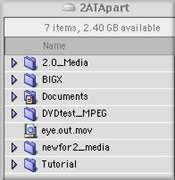
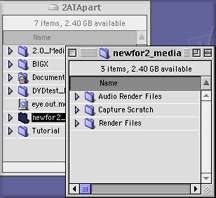
When you are inside your target capture/render drive, select "new folder". Enter whatever you wish to name your destination followed by "_media ".

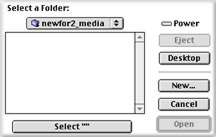
Hit OK, then hit "Select".

After you hit "Select", you'll return to the Preferences. Look at the information next to the Set button. Make sure that you named everything in this capture/render directory with distinctly different names, using the underscore if necessary(the directory is the exact path to the capture and render folders starting at the desktop level, the "2ATApart:newfor2_media" following "2.5 GB on..." in the below picture.)

FCP can confuse folder and drive names quite easily, so use a naming convention that makes sense to you but which is easy for FCP to keep organized. For instance, the drive or folder names "Video 1" and "video 2" are lousy choices; the difference between them can escape FCP. "#1Video" and "#2Video" might be better choices. "Fred" and "Sam" would be even better, if you can keep them organized in your own head.
Click in the check boxes for Video, Video Render, Audio and Audio Render. If you have other drives you wish to dedicate as Capture/Render drives, follow the same process for each, making sure to leave the start-up drive unallocated.
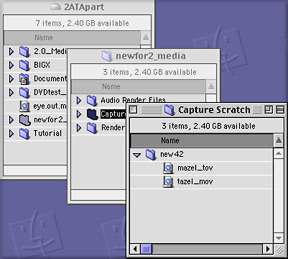
You may be asking yourself right now, "Why do I want to create a media folder for the project? FCP will create a "Capture folder" on the drive I select, so why bother with further delegating it into a specific folder?" The answer is Media Management, my friend. The secret to a happy Media Drive is keeping it organized and tidy. If you simply select the Media Drive as the assigned Scratch Disk, FCP will create three folders on that drive, the Capture, Render and Audio Render folders. Then, every time you create a project, it will create a project-specific folder in each of these folders.

Of course there is intrinsically nothing wrong with that. That's what FCP was designed to do, and it is a vastly improved system compared to the previous version's handling of media. However, there is a potential danger for people who tend to be sloppy with drives. Pretty soon, you may find yourself with generic Capture and Render folders on every drive on your system. And inside every one of these generic folders will be project media folders with different media from different sessions. Tidiness is important. Although the new Media Management tools will allow you to correct this situation easily enough, the best idea is to avoid such a situation in the first place
So every time you begin work with FCP, go to the Scratch Disk preferences and make sure that the folder you created for your media on the Media drive is selected. Doing this will keep your Capture, Render and Audio Render folders grouped together in one location and also ensure that in each, the single correct media folder for your projects is in place.
Version 2.0 of Final Cut Pro contains much stronger Media Management tools than previous versions, but the need to understand and control your media files is just as necessary as ever. Now FCP will let you eliminate media from your drives to make room should you need it. Your capabilities in MID-project are fantastic, but the ability to juggle multiple projects on the same drive and clean up the system after you are finished depends on how carefully you construct your projects at the beginning.
Take responsibility for your own Media Management. Never ask a desktop computer to do a job you can do better.
Make certain to disable capturing Audio and Video to Separate Files.
Another important setting for this preference menu is the "Minimum Allowable Free Space". This is the 10% buffer to which we referred earlier in the article. "Minimum" should be set to avoid getting poor drive performance and possibly dropped frames as a result of drive fragmentation. Drive performance degrades dramatically past a certain point of drive capacity. In the old days, 85% capacity of a drive was generally considered the limit. This meant that on a ten gig drive, you could expect massive drive slow down after writing 8.5 gigs to it. Some really neurotic people (like me!!!) used 75%.
This is not a written-in-stone policy and there are a jillion variables that affect whether or not a drive becomes massively fragmented after a certain capacity. I generally set mine at 1 gig (or 1000mb). A 1 gig buffer leaves plenty of space to avoid fragmentation and is realistically only burning about 5 minutes of capture time. Not too bad. I would recommend that you choose a number that is either 10% of the total drive size or 1 gig, whichever is less. That should keep it happy.
"Maximum Size for Capture/Export" should be left unchecked unless you are attempting something in particular that requires specific limitations on file sizes and/or you know what you are doing. This will not affect your system's performance under generic capture and playback situations. If you are going to use Capture Now (and not the preferable method of logging your clips), you can also enter a maximum limit to the length of the capture. Hit OK in the bottom right hand corner.
If that weren't enough:
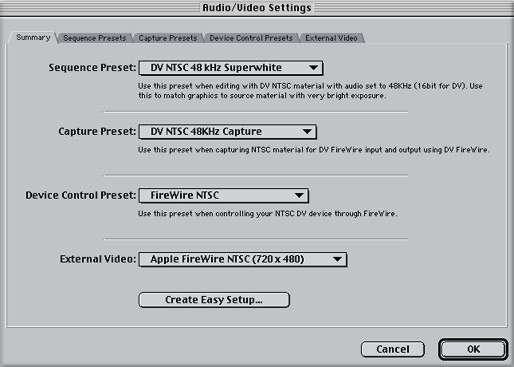
Next you need to set the Audio/Video Settings. You can actually do what is called an Easy Setup to speed up your process in future projects. But you need to do an initial check to make sure your system is set up correctly. Then you can assign this as your Easy Setup, using it every time you work and easily adapting your system when your hardware or media situation changes. To get to the Audio/Video Settings, go to Edit>Audio/Video Settings(N).
This will bring up the A/V Settings

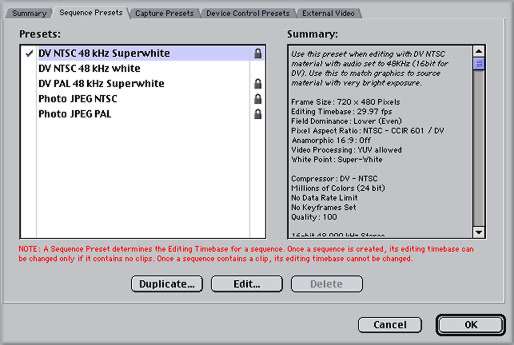
The first tab displays the settings currently active in the other four tabs and lets you set up Easy Setup settings. We'll come back to this tab after configuring the other four tabs. Click on the Sequence Presets Tab

You will want to set up this preset depending on what your own needs are. FCP requires that your settings for Sequences and Capture match, and that both match the actual DV media you capture from tape. For Firewire, the DV NTSC 48K Superwhite preset should be fine here. But most DV cameras allow you to record Audio in your camera at either 32K or 48K. It is IMPERATIVE that you know which you have used, and that you set it correctly here.
A note on audio sample rates
As much as we'd like it to be intuitive and human, FCP really is kind of a stupid machine. It can only do exactly what we tell it. It does not evaluate the data we give it, it simply re-produces that data according to how we have told it the data should be evaluated. If you tell FCP that the audio on your DV tape was recorded at 48k, when it was really recorded at 32k, it will process the audio at the wrong rate. Incorrect audio settings are the main source of out-of-sync audio and video on the timeline.
If your audio goes slowly out of sync as the playhead moves down the timeline, your settings were probably wrong at some point. It is important that you inform FCP what rate the audio was recorded at and that you keep the rates consistent across the application. This means that 48k audio should be set at 48k in the capture settings and sequence settings. Not all cameras record at 48k; the Sony VX1000 only records at 32k, for instance. If using this camera, you must set up your project accordingly.
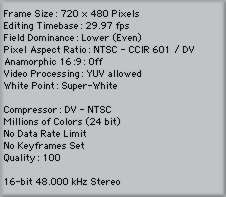
If you need a different preset from those provided, simply Duplicate the DV NTSC 48K Superwhite preset, select the copy, hit edit and change whatever you need to. Be sure to name it something other than Copy, since it no longer IS a copy. Consult the FCP User Manual for more details on what the rest of the settings imply. If you are using 48K audio, the Summary on the right hand side of the Tab should read like this.

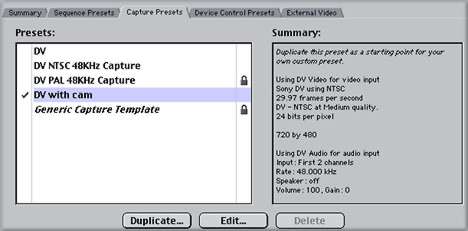
Click the next tab to set the Capture Settings.

As stated above, this Tab needs to accurately reflect the media you will capture through Firewire. The DV preset should be mostly correct, but you may want to Duplicate it and then hit Edit on the copy correctly configure it for your system. Remember that you will need to correctly set the Audio Sample Rate here as well. If you are using 48K, then your settings should look like this in the Summary window.

With respect to Sequence and Capture settings, be advised that you will be miserable if you do not nail this down. If you capture media and then see the red render line when you place it in the timeline, chances are you didn't get these settings correct.
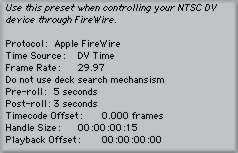
The next Tab you need to address is the Device Control Tab.

Device Control allows you to control, or not control, a Device like a camera or deck. Since you will be using Firewire, whether you are using a deck/camera or a DV converter, you need to check this tab. If you are using a DV converter, you need to select the Non-Controllable Device. If you do not, FCP will try and receive Timecode Data from the Firewire stream that is not there, resulting in failed captures. If you are using a deck or camera, you need to decide between Apple Firewire or Firewire Basic for Protocol (consult Apple's website to see which is appropriate). It is suggested that you set the deck Pre-Roll to 5 seconds and the handles to 15 frames. Consult the Manual for the reasoning behind these settings. The summary should look like this with variations based on your deck or camera situation.

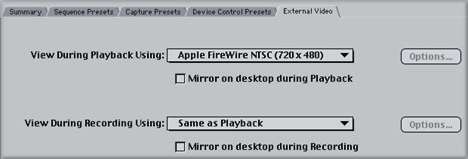
Finally, you need to check the last tab for External Video.

This tab lets you decide how you will monitor the video as you edit. You can decide to watch playback through the Firewire to a video monitor or set it to None for just viewing on-screen. You also tell FCP whether or not to view on your computer monitor while playing back, called mirroring, or recording to tape. Until you have gotten acceptable performance with your system, leave 'mirroring' off. Older systems or systems which are not optimally configured may drop frames if forced to display the video in both places.
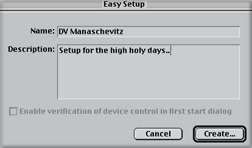
Once you have completed the four tabs, return to the first tab, Summary, and hit the Easy Setup. Now you will take your optimized settings and save them under a preset name.

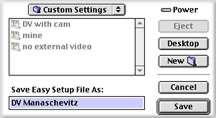
Give the Easy Setup a name, and give it a description. Click Create and save the preset in the Custom Settings folder.

Now when the time comes to work, you can simply choose the preset instead of going through all the tabs individually.
Save Early, Save Often
Finally, its time to name your project and save it appropriately. Remember that we have turned off AutoSave, so any crashes will lose anything you haven't saved. Also remember that the Preferences are not saved with the project file, so you will have to recheck them when you start back up. Go to the File menu and select New Project (unless of course you already have a project you are working on, in which case you would merely open that project). On doing so, any number of the windows shown below will appear on screen.
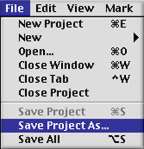
This project you have opened will have the name Untitled 1 assigned to it by FCP. That name is unacceptable. Do not let me catch you with Untitled anything. Name your files according to what they are. To name your project, select Save Project As from the File menu.

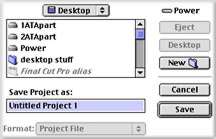
A dialog box will immediately pop up asking you to name the damned thing. FOLLOW THE FOLLOWING METHOD EXACTLY !!! If you do not save your files in the appropriate locations, you will lose everything, hours and hours of work. Save your project files on the desktop and AT LEAST one MAC FORMATTED zip disk. This is REALLY important, Follow the order of these steps exactly...

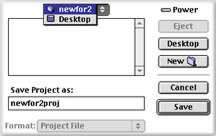
When the Save as Dialog Box appears, do not name your project first. First, hit the Desktop button so that you will be saving it to your Start Up Drive, then select New Folder. It is very important that you not save your project to the same drive that your media is saved to and instead save it to the same drive that your System folder and Applications live on. You will be asked to name the new folder. Name it with your project's name and the word "folder". Remember, unrecognizable stuff is WAY more likely to disappear.

Hit Create and you will return to the Save Project dialog box. Change Untitled to something relevant and then hit OK.

Your project file will now be saved in YOUR folder on the desktop.
Backing up your project periodically is an incredibly important step that you should be doing. You are investing incredible amounts of time and effort and it all boils down to one fragile project file. If that project file goes belly up, your work could be gone for good. That will not be as catastrophic if you are regularly backing up and archiving your project files to another location. I suggest two locations. Have a copy of the project file stored in a separate folder on your hard drive and also copy it out to your zip disk.
To copy them to your zip disks periodically, simply pop in your zip and drag the project folder onto it. Then re-name the copied folder on the zip with the date and time. This process is called sequential back up, because each time you back up your project files to the zip disk (or other folder on your drive), you are creating a version of the project up to the time you copied it. If you ever decide you went a wrong direction with your editing several days back, you can easily return to your previous version. As you copy these project folders from your desktop to the zip disk, you will rename the folder with the date or a number identifying that the project in that folder was current on that date. Sequential Backup is standard in an industry that can not be subject to the whims of a single corruptible project file.
(note-Remember never to run a FCP project from a zip disk. ALWAYS REMOVE YOUR ZIP FROM THE MAC BEFORE WORKING IN FCP.)
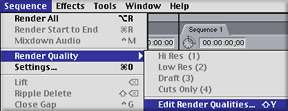
Ok, now the last setting and you're home free. Go to the Edit drop down menu and select Project Properties. The following box will open.

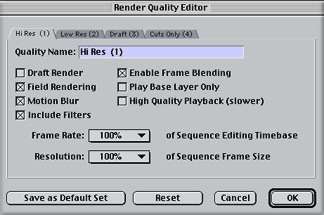
Without altering anything, hit Edit Render Qualities. The next box that opens should look like this. Adjust the settings exactly as shown. The time will come when you can adjust these to benefit and streamline your process, but for now they will keep you from dropping frames.

Hit OK for this window, OK to close the Project Properties window and you have finished your settings. Now you can work reasonably assured that you are not going to drop frames.
Basic Capture Techniques for DV
Don't call it Digitizing!
If you are shooting DV, it's already digital. What you need to do is 'CAPTURE' the digital footage onto your HD.
As with everything FCP, there are at least a couple of methods to accomplish this. The methods seem to parallel certain personality types, so read the following, and pick the method that works best for you.
There is one rule that is not subject to discussion or personality type:
YOU MUST LABEL EACH REEL OF TAPE CLEARLY AND DISTINCTLY, AND YOU MUST ENTER THAT NAME INTO THE 'REEL...' FIELD IN THE LOG and CAPTURE WINDOW.
No ifs, ands, or buts. A cassette without a label might as well be blank, and if you are the stubborn personality type that must learn by experience, soon you will record over a very important tape because you didn't label it.
Luckily, FCP won't let us get by without entering a reel number, but it will let us get by with using the default 'Reel 001' for every tape. Please be vigilant and enter a unique reel number every time.

The default Reel 001; use this only for your Reel #1!
A note on methods:
I prefer to use and teach a two-handed, keyboard in the left hand, mouse in the right approach to editing in FCP. If you are more comfortable using the mouse alone to begin with, here is a substitution chart:
Keyboard
|
Mouse
|
|
Space Bar
|
Play button
|
|
Letter 'I'
|
Mark In
|
|
Letter 'O'
|
Mark Out
|
|
F2
|
Log Clip
|
|
cmd-S
|
File > Save |
|
Preparing to Capture:
Put your first tape in deck/camera.

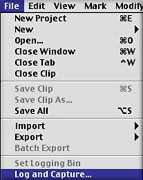
Open Log and Capture under the File menu.

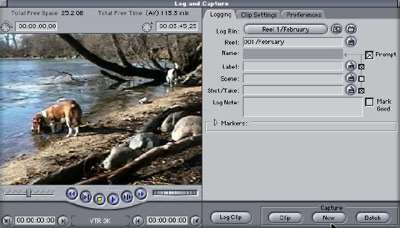
The open Log Capture window

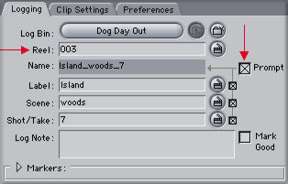
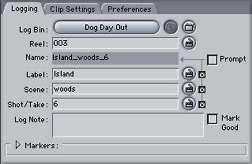
Enter the Reel name on the Logging tab, and put a check in the 'Prompt' box.

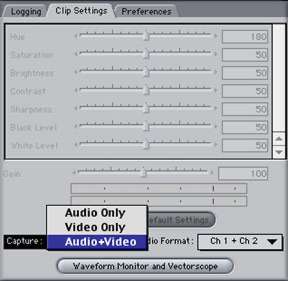
Click on the Clip Settings tab to define what you want to capture:
Audio and Video, just Video, or just Audio. The default, 'Audio Video, ch1 ch 2' will be perfect for most situations.

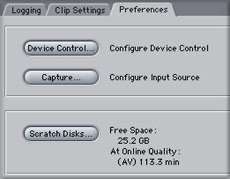
The buttons on the 'Preferences' tab are for verification of the settings you have made earlier
when you set your Preferences (See
"FCP: An Ambitious Beginning"), or for making changes
to those settings without leaving Log and Capture.
Method 1: Classic Log and Capture
Best for Slated, Multiple-Take Narratives.

Spacebar to start the tape rolling, press 'I' at your chosen In point. I would mark the In point after the slate to conserve scratch disk acreage, using the slate as a reference for naming the clip. When you come to the end of the take, press F2 (Log Clip). Pressing F2 sets the Out point and opens the Log Clip dialog.

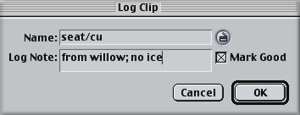
You will get this dialog window after pressing the Log Clip button (or F2)
if you have put a check in the 'Prompt' box.
Name it correctly, write any comment in the Log Note box, and check the 'Mark Good' box for the takes you like best, then OK. The tape should continue to roll, and after the next slate, mark the next In point; F2 at the end of the take, name this take, or allow FCP to increment the take number automatically if it is another take of the same scene.

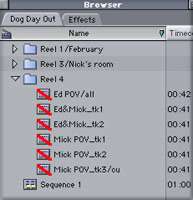
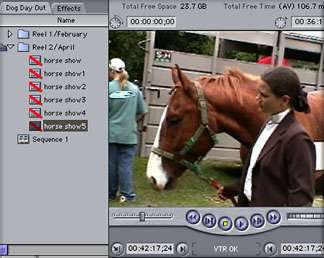
The red line through the clip icons indicates that they are 'offline' (not captured yet).
This method doesn't capture any clips to the HD; it creates a comprehensive LOG, in the Browser, of all the shots on your reels.
When you have finished Logging, you can select the takes with which you want to begin editing, and Batch Capture only those (see below). All the takes you have marked as good will have a check mark by them in the 'Good' column of the Browser for easy reference.

Some of FCP's many Browser columns. Good takes can be marked during or after logging.
Batch Capture
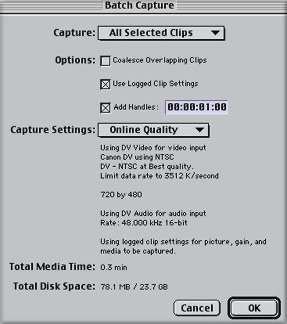
With clips selected in the Browser, go to File>Batch Capture. Choose 'All Selected Clips', and OK.

All the information about the clips you want to capture is presented in this Batch Capture dialog.
Handles

Specify extra seconds to be added to the head and tail of each clip as it is captured. This makes up for reaction time as you press your In and Out points. Your logging should be fairly loose anyway, with at least several extra seconds at head and tail.
Final Cut Pro will call for reels to be inserted in the deck, and it will find and capture the clips you have selected based on their timecode In and Out points.

All you have to do is feed tapes as Final Cut Pro calls for them. This is the time when your naming scheme for tape reels will be called to account. FCP will assume you have inserted the right reel, and will capture the associated timecode range. If it is the wrong reel, it won't be the right shot.
Speed Logging
If you want to quickly separate a reel into individual clips: uncheck the 'Prompt' box, enter a name in the 'Label' field, start the tape playing and enter a first 'In' point.

Every time you hit 'F2' (at the end of each clip), a new clip will be created in the logging bin, with incremented numbers attached to the original name. The tape will not stop rolling, and you will not be given a dialog box to write log notes, or rename the clips.

This log was created by putting the name 'horse show' in the 'Label' field,
then pressing F2 after every discrete clip.
Method 2: Capture A Whole Tape, then Make Subclips
Best for Interviews and Chronological Documentary Situations
Put your first tape in deck/camera.
Open Log and Capture under the File menu.
Enter the Reel name on the Logging tab. `
Click on the Clip Settings tab to define what you want to capture.
Click on the Scratch disk tab to make sure these are correct.
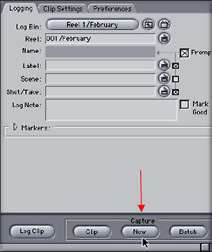
Now, back to the Logging tab. Start the reel playing, and click on the 'Capture Now' button.

Let the entire interview, or the entire reel, if you have HD space, be captured. I advise watching it and making notes. You can't screen your footage too much. The more you watch it, the better you know what you have to work with.
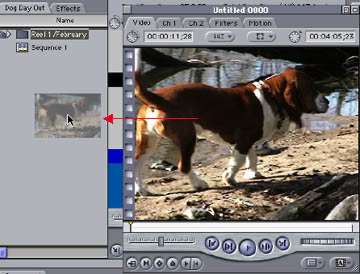
Press 'Esc.' before the end of the tape, so that it doesn't run past the end of the time code. Click on and drag this 'Untitled' clip into your Browser.

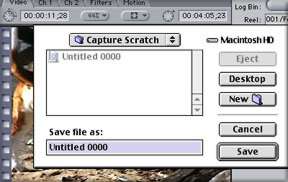
In the Save dialog box that opens, navigate to the Capture Scratch folder that you designated in your Preferences. You will know you have found it when you see a greyed out 'Untitled 0000' in the folder.

Name it, save it, and then close the clip window.
Close the L and C window. SAVE.
Drag your new clip into the timeline.
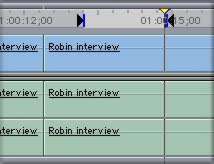
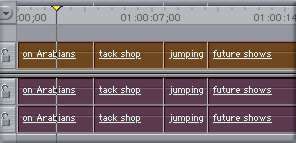
Now you can play and cut this one big clip into smaller, discrete pieces. Cut an interview into coherent sound bites, cut out the interviewer's questions, cut out the shaky camera and swish pans, etc. Use ripple delete to remove chunks, or the razor blade to cut between sections.

Ripple Delete: To remove the selected piece without leaving a gap,
hold down Shift and press Delete.
Put edit points around the section you want to remove, or select an entire clip. Then hold down Shift as you press Delete. The selection will be deleted and the space closed up. SAVE

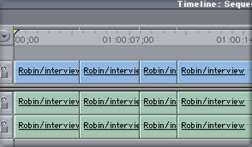
You'll notice that these new smaller clips all have the same name.

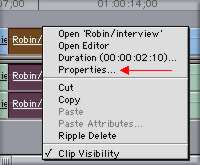
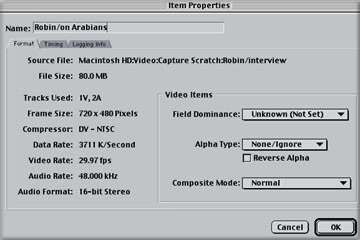
Option-click on one of them and select 'Properties' from the pop-up menu that appears. (Or choose 'Item Properties' from the Edit menu.)

The Item Properties window tells you everything you might need to know about a clip.
Change the name of each new clip to something relevant and descriptive.
Next, select all the clips in the Timeline (Edit>Select All or cmd-A with the Timeline active).

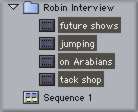
Now you can drag all of the clips into the Browser (or to a specific bin in the Browser), and they will appear as separate clips. At this point, they all refer to the one master clip on the scratch disk.

After dragging all your newly cut apart and renamed clips from the Timeline to the Browser,
they appear as if they were always separate clips.
If you need to conserve disk space, go to File>Save Project, then quit FCP, open the Scratch Disk, drag that clip to the Trash. (Please be conservative when working with video; quit FCP before you do anything at the Finder level.)
When you open FCP again, all the individual clips will be offline, and you can selectively Batch Capture (see above) just the clips that you want.
How to Make that First Cut-
.
Basic Procedure:
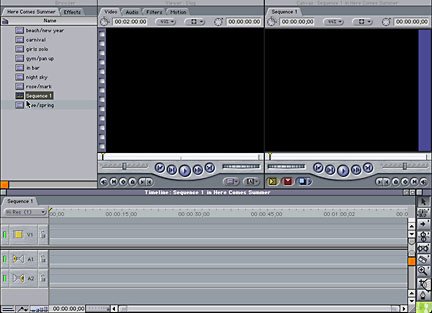
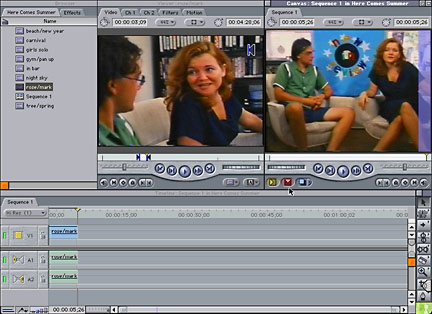
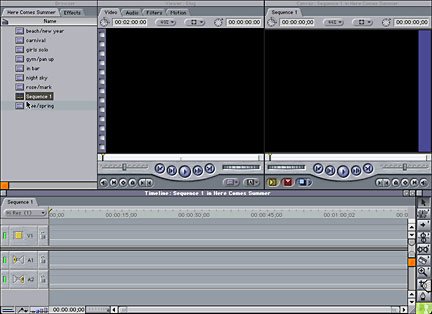
1.) Double Click on the Sequence 1 icon in the Browser

-Clicking on the default Sequence 1 icon in the Browser
opens both the Timeline and the Canvas windows.-
2.)
Double Click on a clip in the Browser ; it will open in the Viewer.
3.) Play it and select your IN and your OUT points ( 'I' and 'O' on the keyboard).
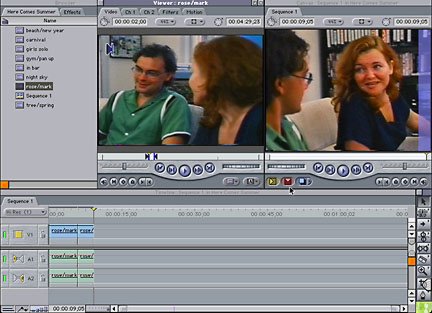
4.) Click on the little red square under the Canvas window (the Overwrite button)

-In and Out points selected in the Viewer,
and edit buttons under the Canvas.-
5.)
Repeat 2 thru' 4 for your next clips in order.

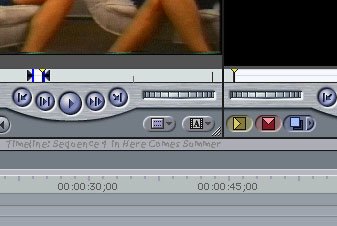
One edit has been made. The Playhead sits on the last frame of the shot, which shows in the Canvas. The next shot is shown in the Viewer with its In and Out points already chosen. When the red 'Overwrite' button under the Canvas is clicked, this second edit will be made.
This will get you an assembly of video clips with sync audio in the order you selected them. This Sequence should be perfectly playable, but without much sophistication. SAVE. SAVE after every move you make. cmd (apple)-S
Fade In From Black, and Other Effects:

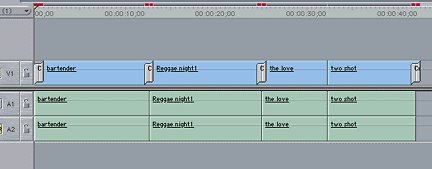
These dissolves were dragged from the Effects tab in the Browser to the edit points in the Timeline. The red lines above them indicate that they need to be rendered before the effect can be seen in real time.
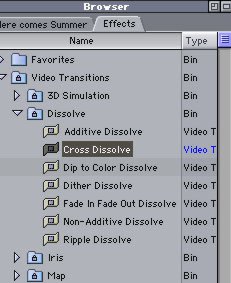
Click on the Effects tab in the Browser >Video Transitions>Dissolve>Cross Dissolve and drag a cross dissolve to the very beginning of your Sequence for a fade in (a dissolve with black), and again to any edit point in the Timeline where you want a dissolve. Again at the end for a fade out.
Under the Sequence menu>Render All. SAVE.

Now you can park the Playhead at the head of the Sequence, start Record on the deck/camera (record the black for 20 or 30 seconds), press the spacebar and your sequence will be recorded to tape.
IF YOU WANT MORE THAN THIS, READ ON...
The beauty of nonlinear is how it affects the working style of the editor. It is the ability to create 'successive approximations' - zeroing in on the ideal finished product - that has enhanced the creative process and productivity in post production. In otherwords, you don't have to get the first edit perfect before you can move on. You don't even have to start on the first shot. You can begin to edit at any scene you wish. This is one way to keep your creative juices flowing; you get to jump into your favorite scene right away. At any time you can come back and finesse each and any edit point to get it exactly right, and to get the rhythm of the whole the way you want it.
The Final Cut Pro window in which this assembling and finessing takes place is the Timeline window, and that window consists of a Sequence.
Sequence, in FCP terms is what you are working on; what you are building as you edit. It can be the entire show, or one scene, or, for example, an hour long project can be worked on as three separate sequences.

There is a Sequence 1', by default, in every new project. Open it to begin editing. Create others by choosing File > New > Sequence. Rename them as you wish.
Double Click on the Sequence 1 icon in the Browser to open the Timeline and the Canvas windows. The Canvas is the visual representation of the Timeline , and the Timeline is the graphical/linear representation of the Canvas. The Canvas shows you the frame that the playhead is on in the Timeline.

There are no video clips in this new Sequence, but it is not empty; it has endless tracks of black and silence. The playhead is at the beginning ('head'), but can be dragged to any location down the line.
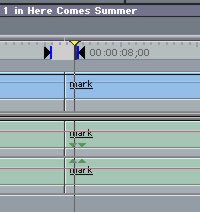
The location of the playhead will be the default IN point for any edit you make, unless you set another IN point in the Timeline.
Three Point Editing
To make an edit, you must define four edit points: the in and out points defining the piece of video that you want to use, and the in and out points in the sequence where you want it to go. Final Cut Pro works on the principal of "3 Point Editing", whereby you provide any three edit points, and the program calculates the fourth.

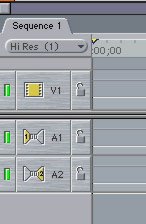
The IN and OUT points for this 3rd clip (in the Viewer), and the location of the Playhead, define the 3 points neccessary for an edit. The edit will be made to tracks V1, A1, and A2, because those are the tracks that are Targeted for this edit. Click the yellow icons on or off to determine the edit you want to make.

Click the yellow icons on or off to choose tracks to be targeted. The numbers '1' and '2' on the audio tracks indicate from which channel of the source clip the sound will come. Track A1 can be targeted to recieve the sound from channel 2, for example. The default configuration is ch1 (L) to A1, ch2 (R) to A2.
An aside to former Linear editors on 'INSERT' edits: An 'Insert' edit in Final Cut Pro means a clip that you place between two other clips. To make what we know as a 'video only insert edit', you target only the video track. For an 'audio only insert edit', click on either ch1 or ch2 on A1 and/or A2, and turn off the video track target.

A 'video only insert edit' in Final Cut Pro. Only the video track is targeted, and the video clip was placed between two other clips. The yellow icon next to the Overwrite button is the Insert button.
TOOLS:
Here are some tips for working with The Trimming Tools:
CUT A DIALOG SCENE
First, assemble the scene with sync shots (as above) so that the dialog plays as it should be spoken; back and forth from one person to the other. If someone blows a line, and you need to use a line from another take, just cut it into the assembly so that the dialog flows. You will cover the jump cut later with a video only Overwrite edit.
Roll
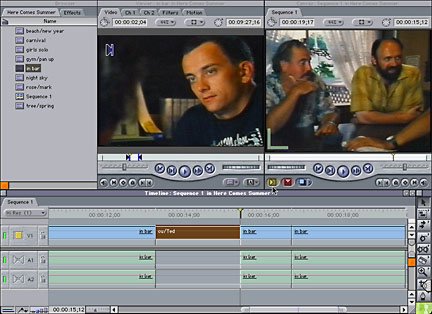
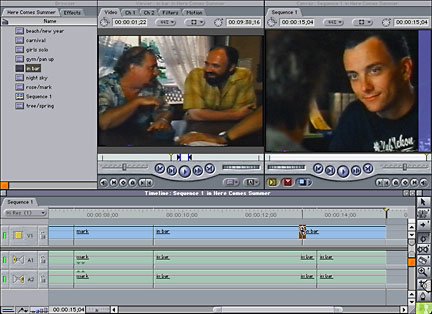
If you want the second person to be seen listening before he begins talking, use the roll tool to roll the second shot back to where you want to cut away from the speaker. Two ways to get this right: 1.) Park the playhead at the spot where you want to be seeing the second person, click on the edit point with the roll tool, drag, and roll his shot down to the playhead. Snapping ON {under the View menu} helps with this placement.

Rolling the bartender's video so that he listens to the last few words of the speaker.The bartender's lines of dialog begin at the next cut in the audio tracks in the TimeLine, and because we rolled his video, he will begin talking in sync Rolling is also a good way to create an L-Cut, in which the audio from the in-coming scene begins under the video of the out-going scene.
2.) If it's a gesture or reaction from the second speaker that you want to see, roll that shot until you have included as much of the action as you want. You will see the in and out frames in the trim edit window that takes the Canvas space. (Snapping OFF helps with this kind of roll edit. Hold down 'cmd' to gear down and move one frame at a time)
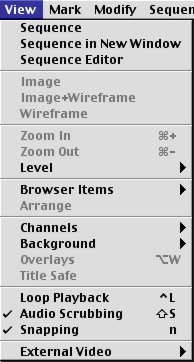
As you can see, Snapping is useful both on and off, and I suggest that you get in the habit of using the 'N' on the keyboard to toggle it on and off as you wish.

The checkmark means that Snapping is on. Select it again to turn it off.
Ripple
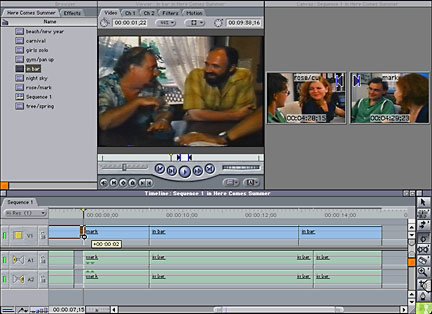
When you want to extend a clip, but not cover over the adjacent clip, you use the ripple tool. Click on the edit point with the ripple tool, and point its little 'tail' in the direction of the clip you want to extend, then drag.

Here I have extended the 'cu Rose' video clip by 2 frames, which pushed everything else down and created a space/pause in the audio tracks. The two small clips in the Canvas show the new last frame of the outgoing clip and its timecode, and the first frame of the next clip: a perfect situation for making a match cut on action.
Ripple Delete
If you need to cut out a piece in the middle of a clip, or trim the end and/or beginning of a shot, Ripple delete works great.

Set IN and OUT points surrounding the section you want to remove, then click Shift + Delete. The section will be removed, and the gap closed. Ripple delete cuts through all unlocked tracks, so be sure that is what you want to do.
Practice with these tools, and experiment with the others. It takes a while to speak the Final Cut Pro language, epecially if you haven't been an editor. Clicking and dragging, slip into sync, razor, select all tracks forward, slipping, and sliding, are all Final Cut Pro tools that I use every day.
Preparing Photoshop files for FCP
Why Photoshop?
There is the old line that goes something like this: "FCP has the best text generator around, it's called Photoshop".
The text generators in FCP are very basic. Aside from limited text ability FCP can only use True Type fonts. Photoshop is a very powerful application which now employs vector graphics for it's text. This plus the fact that Photoshop can use both True Type Fonts and PostScript fonts makes it the text program of choice for many.
We will look at the two basic types of Photoshop images that you might want to bring into FCP. The first is a simple image like a photograph or text on a background. This simple image will not have a transparent background so it can not be superimposed over video. The second type of image will have a transparent background so you will be able to superimpose or composite it over video.
We will be working in the DV FireWire format in this article. If you are using another format the principles will be the same but you will use different dimensions, see the table at the end of the article.
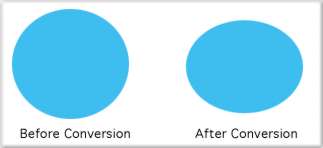
As Photoshop and computers monitors use square pixels and Video uses rectangular pixels to display the image we will need to go through a conversion process to compensate for the change in pixel shape going from computer (square) to Video (rectangular), otherwise your images on NTSC will be distorted, taller, stretched up.
Basic Photoshop image. Non transparent background.
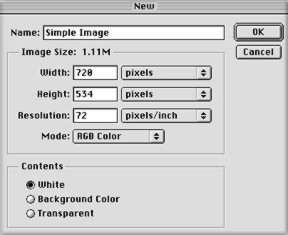
1) From PhotoShop File menu > new.

2) Set Width to 720 pixels, Height to 534 Pixels, Resolution to 72 dpi, Color Mode to RGB, and Contents to White or choose a Background Color. If you plan to do a 'pan and scan' then set dpi to 300.
3) Create your artwork, set text, paste in photographs. When done with your art work do a 'Save As' copy/backup of this un converted image as "Image Name 534".
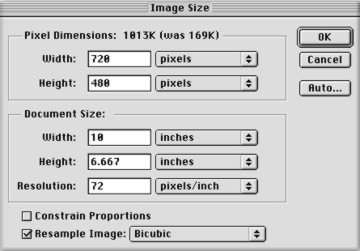
4) File menu > Image > Image size

5) In the Image Size dialog box FIRST uncheck the 'Constrain Proportions' box.
6) In the Pixel Dimension section, top the dialog box, change your Height setting from 534 to 480. Leave the Width setting at 720.
7) Click Okay.
If you look at your image you see that it is now distorted, flatten down. Don't panic, this is the conversion process and when the square pixels get converted to rectangular pixels in NTSC your image will once again look correct.

8) Save as Photoshop format .psd.
9) Import into FCP and render. You will see that your image on NTSC once again has it's proper proportions.
Photoshop Image with transparent background.
The process is basically the same. You will use this approach when you have titles, art, logos, etc. that you want to superimpose over video.
1) From PhotoShop File menu > new.
2) In the contents section select 'Transparent'.

3) Create your artwork, set text, paste in logos etc.
4) Continue on using steps 4 through 8 above.
Creating Layers in Photoshop
Layers in Photoshop are very much the same as multiple video tracks in FCP. The advantages of using layers are two fold. First, in PS you will be able to change any one layer at any time without changing the rest of your work. Second, in FCP you will be able to use each of these layers as a separate video element, each layer on it's own video track, with keyframing, control over motion, opacity, transitions, etc.
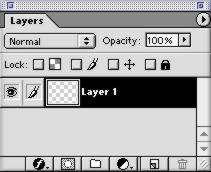
When you open a new file in PS the Layers Palette will show one layer or 'Background'. This first layer can be either transparent or non transparent depending on your needs. If you do not plan to superimpose this art work onto video then this first layer or background (non transparent) can be any color or have any artwork that you wish, like text, a drawing or photograph.

If you plan to superimpose your PS file over video and have selected a transparent background then leave this first layer alone. Don't put any art into it. Before you start to create your artwork open a new layer from the Layers palette and name it.

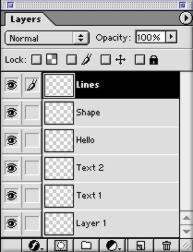
Make a new layer for each different element of your art work. You can have as many layers as you want. At any time you can click on any different layer in the Layers palette to make it active and modify it without changing any of the other layers. This is most helpful when you want to move elements around to align them. You can also click on any layer in the layers palette and drag the layer to a different position in the palette. This is how you control which elements are on top of or behind each other. If you want to remove a layer from your composition simply click on it and drag it to the small trash can at the bottom right of the layers palette.

When you are done with your art work I would first recommend that you make a duplicate of it, a back up. Save this back up, you may need to make changes at a later time.
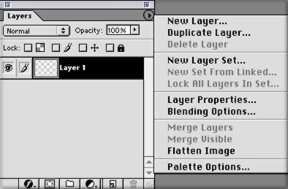
There is one more thing to consider. If you do not plan to use unique layers in FCP you can select 'Flatten Image' from the Layers palette menu. This will collapse all your layers into the background. Flattening will give you a solid color background so before you flatten set the background color of your choice. When you import this flatten image into FCP, FCP will see it as a still frame. If you want to keep your layers unique for FCP then do nothing and follow steps 4 through 8 above.
On to Final Cut Pro
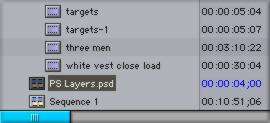
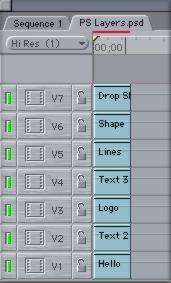
If you have kept all your Photoshop layers unique then after importing your image into FCP, in the Browser you will see that your PS file has now become a Sequence, not a still as when you have flattened your image in PS .

Drag your PS Sequence to the TL, double click it to open the Sequence.

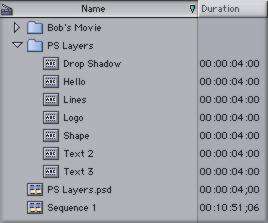
In your Browser create a new Bin and name it after your PS file. Select all the clips in the PS Sequence in the Timeline and drag them into the new Bin in the Browser. Each PS layer has now become a unique clip. It has become a still. Cool. You will notice the duration for my stills is 4 seconds. To set the duration that you want for your stills; Menu > Edit > Preferences > General tab. 'Still Image Duration' enter the duration that you want your stills to be before you import them into the Browser.

Close the empty PS Sequence and delete it from the Timeline, you can delete the old PS Sequence from your Browser as well.
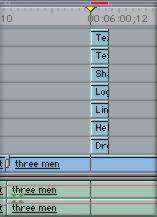
You can now drag your stills (PS layers) to the Timeline and stack them on top of each other.

Each layer or element of your Photoshop file remains unique, this affords you the opportunity to move each one around on the Timeline and to apply all the effects that FCP has to offer. You can also apply FCP plug ins like Graffiti to each unique clip.
Caveat, there is always one caveat.
Newer versions of Photoshop now employ vector graphics for its type. If you are doing text but not using any of Photoshops' built in special effects such as drop shadow, emboss, bevel, etc, or if you do use these effects and 'flatten image' or 'merge visible layers' then there is no problem.
If however you use these effects and save your layered image 'as is', when you import into FCP you will see that all your effects are gone. If you do a 'rasterize' or 'rasterize all layers' from the Layers menu in PS, your type will be rasterized but not your special effects.
There are several work arounds for this. If you have Photoshop plug ins like 'Eye Candy' you can use Eye Candy to do drop shadow, emboss, inner bevel, etc. When these effects are done with Eye Candy they will not be lost when importing into FCP.
If you are using the Photoshop built in effects, when you have completed your work but before you do anything else you will need to do the following. In the Layers Palette place a new empty layer just beneath each one of your layers that contains PS special effects. So you might have: real layer- empty layer, real layer - empty layer, well, you get my drift. Now select your first layer that contains your special effects and from the Layers Palette choose 'Merge down'. This will force both your type and special effects down into the empty layer just beneath and rasterize both in the process. Then move to the next layer that has special effects and 'merge down'. Now when you import your layered PS file into FCP you will still have unique layers and the attending special effects. Extra steps to be sure but it does work.
Video Format
|
Square Pixel
Photoshop
|
Rectangular Pixel
FCP
|
|
601 NTSC 4:3
|
720 x 540
|
720 x 486
|
|
601 NTSC 16:9 anamorphic
|
864 x 540
|
720 x 486
|
|
DV NTSC 4:3
|
720 x 534
|
720 x 480
|
|
DV NTSC 16:9 anamorphic
|
960 x 534
|
720 x 480
|
|
601/DV PAL
|
768 x 576
|
720 x 576
|
|
601/DV PAL Anamorphic
|
1024 x 576
|
720 x 576
|
|
720i/p high definition
|
1280 x 720
|
NA
|
|
1080i/p high definition
|
1920 x 1080
|
NA |
|
From Final Cut Pro to the Web
You have been working in FCP and now the movie on the Timeline is finished. You want to convert this full quality DV movie into a much smaller QT movie for the web. Using FCP and Media Cleaner EZ that came in your FCP package we will make a QT movie for the web. So how do we get it from FCP to the web?
Well ... not so fast. Let's take a look at what we are trying to do here. We want to take our DV quality movies, which happen to be rather large in size, and somehow squeeze them down through the telephone lines, at the other end we want our movies to look really good. Not easy but we have some good tools to work with.
We use a tool called a 'codec', which is short for 'compress/decompress'. A codec is a mathematical formula that compresses large video files down into very small ones and then opens them back up again. Sorenson, MPEG-1, and Cinepak are often used. These codecs work by throwing information away, they are called 'lossy' codecs.
So how small do you want your QuickTime file to be? Depends on how much information you are willing to throw away. It's a trade off, the smaller the file the greater the quality loss. While 56K is the defacto modem of today, faster bandwidth (DSL and Cable) is here and this means that soon we will be able work with larger files - higher quality QuickTime movies. So how do we get it from FCP to the web?
It's a two step process. (Isn't everything)
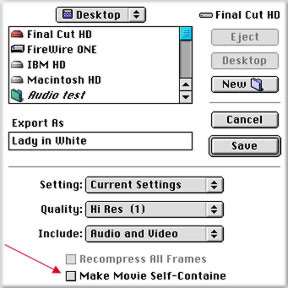
The first step is to get the movie out of FCP at maximum quality. The second step will be to compress it into a small QT movie for the web. There is a very important point to be made here. Regardless of how you export from FCP, either as a FCP movie or a FCP 'Reference' movie, you must always export with no compression. "Recompress All Frames" will be UN Checked. All of the compression work will be done in the second step using Media Cleaner EZ.
I just mentioned that there are two types of FCP Movie. A long time ago, back when our Grandfathers were cutting in FCP, back around 1999, there was only one type of Final Cut Pro Movie. These FCP movies were fully self contained versions of the Timeline movie. Media and all. Exporting several minutes of movie will make for some rather large files. This process does work, the quality is the same, but now we have an easier way to export.
Since FCP version 1.2.5 there is the ability to export as a Final Cut Pro 'Reference' movie. A FCP Reference movie contains all the information about the movie but none of the media. The FCP Reference movie does just that, it references the actual media on your Hard Drive. As a Reference movie contains no media it's file size will be very small, this saves disk space. A FCP Reference movie also exports more quickly then a FCP movie. There still are some reasons for exporting as a FCP movie rather then a FCP Reference movie. The obvious one is that it is self contained so it would be excellent for portability or archival purposes.
Exporting from Final Cut Pro - Final Cut Pro Reference Movie - Step One
You have to decide what you want to export. If you want to export an entire Sequence you can simply select the Sequence in the Browser window and export, if you want the whole sequence, you need to make sure you have deleted any 'in and out' points in the sequence. But this may not be what you want. Often in our Sequences we have at the start, a black header, FCP countdown, and 'bars and tone'. There may be material at the end of the Sequence as well. We really don't want to include all this material in our web movie. There will be times when you want to export only part of your movie.
We can be more selective by setting 'in and out' points in the Timeline.

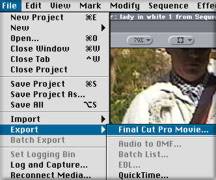
With 'in and out' points set and the Timeline active go to the File menu > Export > Final Cut Pro Movie. If the Export button is grayed out this means that you have not unlocked QT Pro. To unlock QT Pro enter the QT serial number that came with your FCP package. The serial number will be on the same piece of paper as your FCP serial number.

The 'Save' dialog box is set to 'save' to the Desktop. Settings are at 'Current Settings', which means that they will be exactly the same as your Sequence setting, this is a FCP Reference movie after all. The Quality is at 'Hi Res', and both Audio and Video are included. At the bottom of the box is the "Make Movie Self-Contained" box. Leave this box UN checked. The "Recompress all Frames" option will be grayed out. Click on Save and your Reference movie will be exported to your Desktop. Notice that the FCP Reference movie has the 'clap stick' icon.


Media Cleaner EZ for QuickTime - Step Two
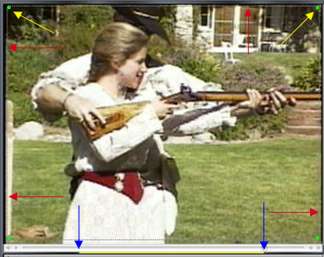
Now that we have exported the movie from FCP it's time to compress it for the web. Open Media Cleaner EZ and drag the FCP Reference movie on to the EZ interface. Your video will show in the EZ interface. First, click on your video in the EZ interface, this will open a new window that will allow you to crop your movie or set new 'in and out' points. Often there is a need to crop as the edges of the video can have thin black borders or funky pixels at the edges.

In the 'crop' window the red arrows point to the black edges that border the video, you can also see ragged pixels at the very edges.
The yellow arrows point to the corners of the bounding box that you click on to drag and crop your image.
The blue arrows show the 'in and out' points that you can set. Most often we set the 'in and out' points in FCP.
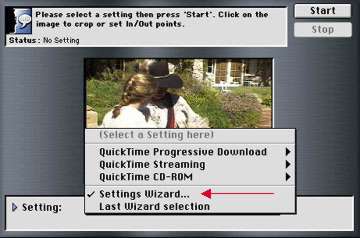
Once you have cropped your video go back to the Media EZ window, shown below. From the Settings pop up menu select "Settings Wizard" and click start. The "Settings Wizard" will walk you through a set of steps by asking questions and showing examples. At each stage you will be able to pick different settings that will effect the quality of your audio and video, all in the name of smaller files - shorter download times.

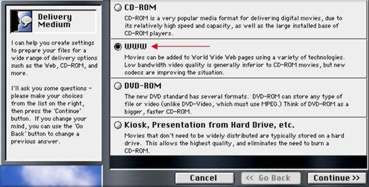
The first Wizard box asks us what delivery medium will be used for this movie. As this article is about the web we want WWW.

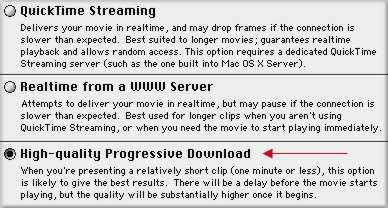
The next Wizard box asks about Delivery Style. I have chosen "High-quality Progressive Download". My clip is short, just about a minute and this method delivers a bit higher quality than the other two options. If your clip runs more than several minutes you may want to consider using "Realtime from a WWW Server".

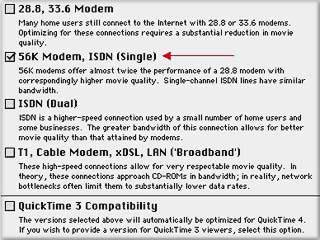
Pick the speed of the modem for your target audience. It would be great if everyone were on DSL or Cable, but most aren't. The majority of people are on 56K.

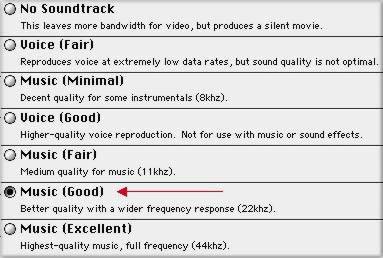
The Wizard's Audio Settings. This setting will determine which Audio codec is used and the amount of compression that will be applied to the audio. I always go with "Music (Good) as I have found that it gives very decent sound. It seems that I always have some music in my movies. If your movie is voice only then you can use "Voice (Good), slightly smaller file size.

Video Codec. Now we chose a codec for our movie. This Wizard box shows us samples of "H 263" and "Sorenson". If you move your curser over the two little video boxes the demo video will play. If you look carefully you can see the difference between the two versions of the video. When you have made your choice click on the codec name and the bar will turn green.

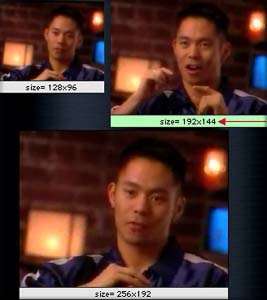
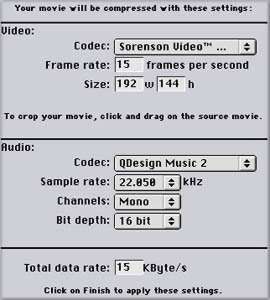
Set dimensions for your web movie. This setting, along with frame rate below, really determine how huge your file will be. When we were all running 28.8 modems anything larger then 128 x 96 took forever to download. (Everything took forever to download). I think that 192 x 144 is a good compromise on frame size. Again, if you move your cursor over the three options the video will play a demonstration. Click on the one you want and the bar will turn green.

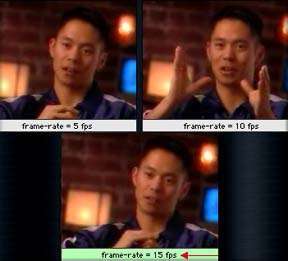
Frame Rate. Playing each one of these samples quickly demonstrates your choice here. I have chosen 15 fps. To give you an idea of what 15 fps looks like. With FCP running on a G3 without AltiVec, the Canvas window plays at about 15 fps. The word choppy comes to mind. If your movie does not have much movement you might try 10 fps.

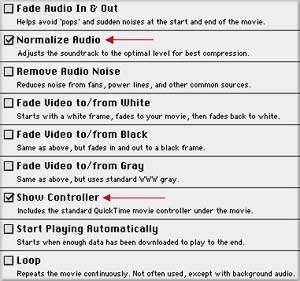
Option settings. This box is self-explanatory. I have "Show Controller" checked, this is must. The other option I sometimes use is '"Normalize Audio", when I feel that my audio volume is a bit low.

Summary. This is the last Wizard box that you can choose settings. While it is a Summary box, each and everyone of the settings can be changed right here. This is your last chance to fine tune your movie.

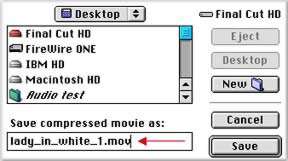
You will now get a start box (not shown). At the bottom of this box there will be a final summary of your settings. Click 'Start' and you will get a Save Box. Name your movie and save it to your Desktop.

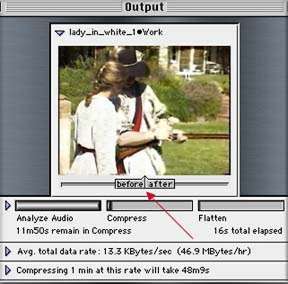
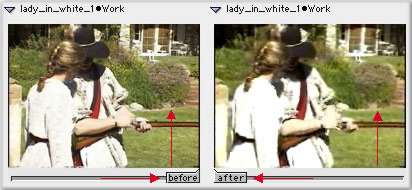
Cleaner EZ now goes to work. You will get a message 'Initializing' and then the 'Output' Box will appear. In the Output box you will notice a 'before' and 'after' slider.

While Media Cleaner EZ is doing it's work you can move this slider to preview what your movie will look like after it has been compressed (shown below). Note the loss in quality in the bushes in the background. You can see that much of the detail in the girls dress has been lost.

When Cleaner EZ is finished you will get a Play window in which you can run your finished web movie.

And here is what you get. One QuickTime movie for the web and the html tags required to place the movie on your web page.

In Session: Integration between Final Cut Pro and Pro Tools Free.
With the introduction of version 2.0 of Final Cut Pro, Apple has given us the ability to delve more into audio editing with the OMF export feature. OMF stand for Open Media Framework, and is a way for audio and video files and playlists to be transferred from one editing system to another. There are numerous video and audio companies that support OMF (Apple, Avid, Digidesign, SSL, Sonic Solutions, Discreet, etc.) and allow their products to become more integrated with each other without the need to reprogram their interfaces.
The most useful part of OMF for Final Cut Pro and Avid users is the ability to export audio from the timeline directly into Pro Tools. All of your audio edits and fades can easily transfer over to an audio editing system for sweetening. When finished, the audio editor can layback the finished mix directly to the master tape, or export a file for import back into the video editing system. The most useful part of the whole process is that the audio editor will receive not only the final edit, but also handles on the edits as well. Access to these handles makes it easy to blend edits together and smooth out the mix- a task that is much easier on an audio system than a video editing system.
We'll start this lesson at the very beginning- acquisition of material. If you're using a DV camera you must check your audio settings. Too many cameras are coming from the factory with the audio settings set to 12 bit/32 KHz. DV cameras have two settings- 12 bit and 16 bit. The 12 bit setting records at 32 kHz and the 16 bit setting records at 48 kHz. There is no reason to ever use the 12 bit setting unless you are planning on doing overdubs directly into the camera. Since you're reading this article, I'll assume that you will be using Final Cut Pro, so a 16 bit setting is mandatory in my opinion.
When capturing into Final Cut Pro, make sure your capture setting is set to 48 kHz as well as your sequence setting. It is possible for Final Cut Pro to play back 48 kHz audio in a 44.1 kHz sequence, but you are putting undue strain on the realtime sample rate conversion capabilities of Final Cut Pro, and could possibly drop frames as you are playing. Always try to match your audio file settings with your sequence settings.
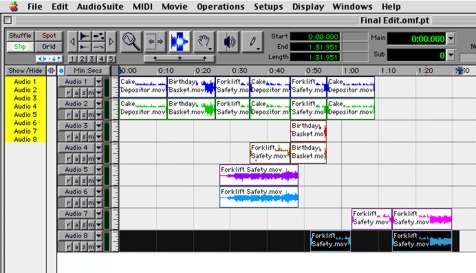
As you're editing, try to place like types of sounds on the same tracks. For example, I always place dialog on tracks 1 and 2, music on tracks 3-6, and sound effects and miscellaneous effects on tracks 7 and 8. Final Cut Pro supports up to 99 audio tracks, so if you need to add a couple more audio tracks, it is possible. However, keep in mind that Pro Tools free only supports up to 8 audio tracks, so if you make 9 audio tracks, then the ninth will be excluded from the OMF transfer. I suggest keeping your sequences under the 8 track limit. There are ways around the 8 track limit if you are using Pro Tools LE or TDM, but for now lets stick with the basic stuff.
Feel free to add as many edits as you'd like on your audio tracks. Audio transitions will also pose no problem to your OMF transfer if you've updated to Final Cut Pro version 2.02 (there were some sync issues with transitions that have been resolved). If you want to do some volume automation, or rubber banding, these will not transfer. All files will open in Pro Tools at their default, zero level, so your Final Cut Pro mix will simply be a temp mix.
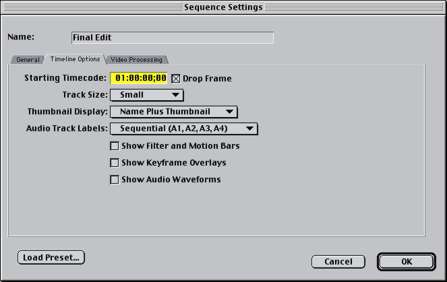
There are a couple of items on our checklist before we export the audio. First, it is important that you verify the starting timecode and code type of the sequence before we continue. Click on the sequence and choose sequence settings (command-0) from the sequence menu. Click the timeline options and note the starting timecode. This code reflects the first frame of the sequence. I will usually choose 00:58:00:00 which gives me enough time to place bars and tone as well as a slate and countdown before a 1 hour start (30 sec black, 1 minute of bars and tone, 10 sec of black, 10 seconds of slate, 10 sec of black, 1 hour program start) If you are working in a television environment or need exact program length, then leave the drop frame box checked. It is unnecessary is you are doing film work or other non-television specific projects. PAL users will not need to worry about this option.

Figure 1: The sequence settings window allows you to change the starting timecode of the sequence and its drop frame/non-drop frame status.
If you add bars and tone, you will need to choose a reference level for the audio tone. It is important to understand that the tone you place in your sequence will be of little use to the Pro Tools editor. Since OMF is a direct file transfer, there is no need to align anything inside of Pro Tools. It simply will open your OMF session and the files will reside on the timeline. The only use for placing the tone in the sequence is if you are laying back, or making an edit to tape of your sequence. The tone is necessary to align the recording deck to your mixing reference level. Sony has essentially set the standard for the amount of headroom necessary in digital recording. They say that there should be around 20 decibels of headroom before distortion in a digital world. Therefore, -20 db on a digital meter should equal 0 VU on any analog device. The only problem with that school of thought is that this is all based upon your material starting in a 20 or 24 bit environment. You see, every 6 db drop in gain is equivalent to losing 1 bit of information. In a 20 bit world (most of Sony's digital decks), losing 2 or 3 bits of headroom is OK since you still end up with around 17 or 18 bits of useable information. In our 16 bit world (all of your DV decks), if the average volume of your material is at -20 db, you are essentially only using around 13 bits of information- thus increasing the presence of your noise floor. So, you see that it is important to set your reference level as high as possible (smallest headroom possible) so you use the most amount of significant bits in your mix. I recommend setting your tones to -14 db and using this level as your 0 when mixing and laying back to analog devices.

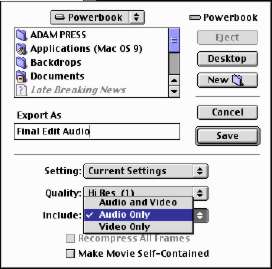
Figure 2: When exporting a stereo bounce, or temp mix, choose Export Final Cut Pro Movie and check audio only.
One other housekeeping task you might want to consider is doing a temp mix for the Pro Tools engineer. This would essentially be an audio mix performed in Final Cut Pro with approximate levels of how you want the mix to sound. Simply adjust the volume levels of the clips in the sequence to their preferred levels. Mark an in mark at the beginning of the sequence and an out mark at the end of the sequence and choose export Final Cut Pro Movie in the file menu. Choose audio only in the pop up menu and hit save. Import the newly created file back into Final Cut and place it on the final two tracks of your sequence. Make sure you don't exceed a total of 8 tracks. If adding the new temp mix exceeds the limits, you can perform the export without your bounced file and simply include it on the transfer disk as a separate stereo file. This file can later be imported into Pro Tools using the Import Audio from other movie menu item found in the movie menu. A safe way to make sure all audio and video is in perfect sync is to add a 2-pop to your tracks. This would entail generating a white frame which start exactly 2 seconds prior to picture as well as a frame of 1 kHz audio tone corresponding to the white frame. There are some countdown, or leader assets which you might be able to find around the web, which would already have the work done for you. If audio and video ever get separated, simply align the white video frame to the audible pop on the audio tracks.
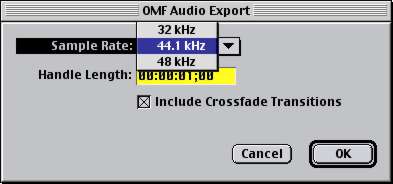
Now we're ready for export. Click on the sequence you would like to export and choose OMF Audio Export. In and Out points will be ignored, so the entire sequence will be exported. If you are using Pro Tools Free, you MUST choose 44.1 kHz. Pro Tools free only supports 44.1 kHz sample rates.. If you are using Pro Tools LE or Pro Tools TDM, then 44.1 and 48 kHz are both viable options. Don't ever choose 32 kHz since it cannot be read by any of the current translation tools. You can also choose the Handle Length of the audio files that you are exporting. Remember that audio files occupy much less space than video files, so exporting with the largest possible handles is always recommended. This allows you more flexibility in Pro Tools if you are faced with the problem of trying to remove a pop or breath. I usually choose 3-5 second handles. You can also choose to include audio crossfades in the export. The default is checked, meaning that fades you make in FCP will transfer to Pro Tools. Crossfades can easily be removed in the Pro Tools session if necessary, so leaving it checked is safe.

Figure 3: Choose the sample rate of your OMF export. Pro Tools Free only supports 44.1 kHz while Pro Tools LE and TDM support both 44.1 and 48 kHz. 32 kHz is not supported by either- so don't choose it.

Figure 4: Final Cut Pro analyzes your audio clips and creates a single OMF file.
You will see Final Cut Pro analyzing all elements on each one of your tracks from the start to the end of your sequence. It is essentially taking your audio clips and converting them over to AIFC media and packaging all your audio elements into one OMF file. Currently, OMF files cannot exceed 2 gigabytes in size, so if you think you are going to go over that amount, simply cut your sequence up into two pieces and perform two OMF exports. A one hour sequence with 4 filled audio tracks would take up approximately 1.2 gigabytes.
The resulting OMF file will now contain all the audio elements from the sequence in one file. If you go to the finder and get info on the newly created file, it should be at least a couple of megabytes in size. Assume around 5 megabytes per mono minute, and see if your file is close. If it is under a megabyte, you might have problems. Your new OMF file should also have the .omf suffix after its name. It's a good idea to keep that suffix in case you don't remember what kind of file it is. Currently, there is no OMF specific icon, so your file will be iconless. It is also important to keep the suffix if you are transferring the OMF file to a PC so the file type will be recognized.

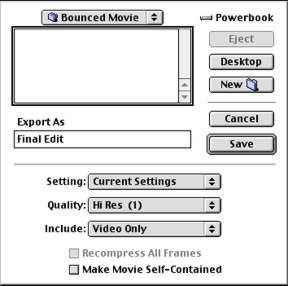
Figure 5: When exporting your video, you can make a reference movie by unchecking the "Make Movie Self-Contained" preference.
Since Final Cut Pro only supports OMF audio export, and the resulting file will not have your video elements embedded in the file, it is necessary to export the accompanying video elements. Click on the sequence and load it into the timeline. The OMF audio export you just exported is based upon the start of the sequence. If we want the video to be synchronous with the audio, we need to make sure there is no mark in on the timeline. The safest thing to do is to clear both the in and out marks by hitting option-x. It is also necessary to render all un-rendered material by hitting option-R. Now go to the file menu and choose export Final Cut Pro movie. Our goal is to export the movie without changing its size, compression, or frame rate attributes. We also have a choice of making a reference movie or self-contained "bounced" movie. If you intend to do your Pro Tools audio sweetening on the same system that your Final Cut system is located on, then create a reference movie. If you are simply copying all the elements to another drive that will leave the studio, then self a self-contained movie is a better choice. Keep in mind that a self-contained movie will take up about 1 gigabyte for every 5 minutes (DV compression), where a reference movie is much smaller and only "points" to already captured clips. Also choose video only since the audio has already been exported via OMF.
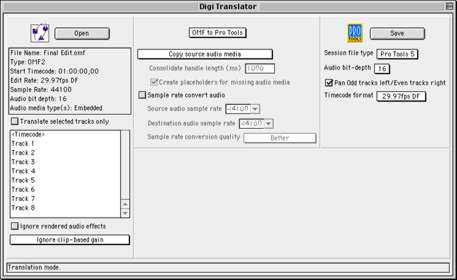
Once completed, we are essentially finished with Final Cut Pro. We have created an audio OMF file as well as a Quicktime DV reference movie and are ready to convert the OMF file into a Pro Tools session. The OMF cannot natively be read by Pro Tools and must be converted into a Pro Tools session first. We can use one of two Digidesign products to accomplish this- OMF Tool or Digitranslator. OMF Tool is free from Digidesign and does most of what you will probably need. Digitranslator is a commercially available program and adds the flexibility to convert your Pro Tools session back into an OMF file for transfer back into an Avid or other editing application. It has the ability to perform a couple of additional tasks which the free OMF Tool cannot. Digitranslator gives you information regarding the OMF file in the upper left of the window. It states the starting timecode (our sequence starting timecode), frame rate, sample rate, and bit depth. It allows you to translate all or only selected tracks into the newly created Pro Tools Session. It also has the ability to consolidate media directly from within the application. This means that if 30 second handles were exported from Final Cut Pro, and you only wanted 2 second handles, Digitranslator would delete 28 seconds of audio handles as it created your Pro Tools session. Sample rate conversions are also possible from within the application, so if the OMF file was exported at 44.1 kHz and you really wanted a 48 kHz session, you'd be able to convert the files as it created a new Pro Tools session.

Figure 6: Digitranslator has many more options than its free counterpart.
Lets work with the free version, so our next step is to run OMF Tool 2.08 and open your newly created OMF file. Choose to save it as Pro Tools 4. Pro Tools Free 5.01 will open up older (Pro Tools 4.0) sessions with no problem.
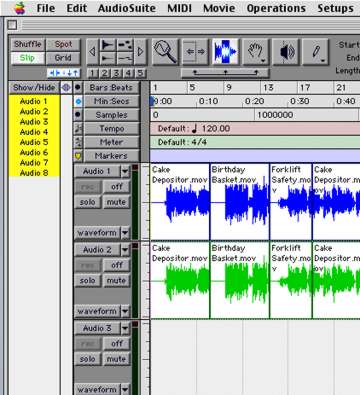
Run Pro Tools and open the newly created session. There are a couple of session maintenance procedures that we need to do before we import our video track. First we need to unsafe all the record buttons on the tracks for future recording. Hold command-option and click on any record button to unsafe the tracks.

Figure 7: Hold command+option and click on the record buttons to "unsafe" all of the audio tracks in Pro Tools. You might also want to turn off some of the rulers under the display menu and show only minutes:seconds.
You also should go to the display menu and choose ruler shows- minutes:seconds. There is no timecode ruler in Pro Tools Free- only minutes:seconds, bars:beats, and samples. Pro Tools TDM versions have the capability to show the timecode ruler, so use it if you've got it.
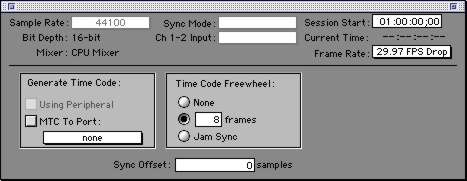
Also open the session setup window and make sure the frame rate is the same as your original Final Cut Pro sequence. Notice that the sample rate is unswitchable in Pro Tools Free and only supports 44.1 kHz. LE and TDM support both 44.1 and 48 kHz sample rates. Your session start should also match the start time of your exported sequence.

Figure 8: The session start should transfer over from the OMF file. If you'd like to change it, don't forget to hit the return key after typing in the new timecode to take effect. Pro Tools Free only supports 44.1 kHz, so the Sample Rate display is grayed out.
Now its time to import your movie: choose import movie from the movie menu and open the reference movie. It will now appear in the Pro Tools timeline as a video track. The video clip will automatically be placed at the beginning of the session, and will be already be in sync with the audio. To place the video track at the top of the timeline, click on its track name and drag it above the first audio track.
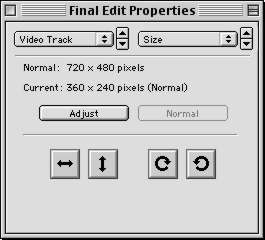
At this point, you will be able to see an NTSC 720X480 or PAL 720X576 pixel sized window on your screen. It is not possible to resize the window in Pro Tools and make it smaller, but you can accomplish this in Qucktime Player before you import the movie. Open the movie in Quicktime Player and choose movie properties from the movie menu (command-j) Choose the video track and scroll to the size properties.Click the adjust button and hold the option key (to constrain the window) and drag the lower right of the movie window to the upper left until it is half the size (An interesting aside is that if you choose a size of exactly 320X240 pixels, then Pro Tools will be able to do a process known as pixel doubling on your movie. The catch is that you must have two monitors with the second monitor set to a resolution of 640X480. After importing, you can click on the movie which will cause it to bounce over to the second monitor and fill up the entire screen). Now go and import your movie into Pro Tools.

Figure 9: It is possible to adjust the movie window size in Quicktime before importing it into Pro Tools. Go to movie properties, hold the option key, and adjust the size of your movie.
After you have cleaned up all of your audio elements, performed volume automation, and added any reverb or effects, its time export your final mix. Make sure that all the tracks you want to hear are unmuted. Basically, what you hear is what you get. Select the amount of time you'd like to bounce. I suggest you click on the longest track and hit return to go to the beginning of the session. Then hit option-shift-return to highlight to the end of the session. It doesn't matter that only one track is selected, all the tracks will be included in the bounce.

Figure 10: Make sure you highlight from the beginning of the session all the way to the end (option-shift-return) before choosing to bounce. The highlighted selection does not have to be seen on all tracks- only one.
Go to the file menu and choose bounce.

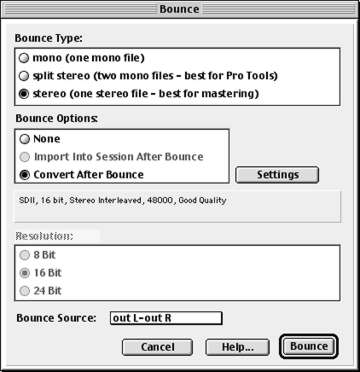
Figure 11: Choose stereo file and convert after bounce if you are using Pro Tools Free. TDM and LE users are able to work in 48 kHz, so a sample rate conversion is not necessary in those cases.
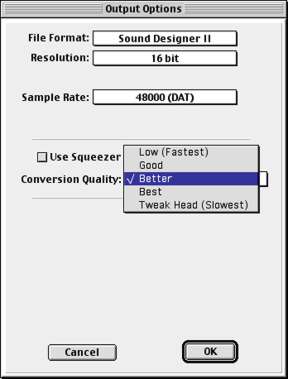
Final Cut Pro can import a variety of formats. The first option we have is the bounce type. All three formats are supported, but I recommend stereo since the resulting file will be 1 stereo interleaved file as opposed to two files representing the left and right side of your mix. If you are using Pro Tools Free, your session is currently 44.1 kHz. Choose to convert your mix after the bounce to 48 kHz for import back into Final Cut. Also choose the file format in the bounce options settings. Sound Designer II and AIFF formats will both work equally well. The conversion quality is also important, and can be switched. Faster sample rate conversions yield lower quality while slower conversions (tweak head) will sound better. Your final file should be a stereo interleaved SDII or AIFF 16 bit/48 kHz file.

Figure 12: Pro Tools Free sessions must be converted on export back to 48 kHz. Choose Tweak Head conversion to have the sample rate conversion sound the best.
Open Final Cut Pro and import your final mix into the browser. I usually duplicate the sequence, delete all audio tracks, and place the new audio mix onto the first two tracks starting at the beginning of the sequence. If all the steps have been followed, the audio and video should be in sync. You can now output your married sequence back to tape using either the print to tape or edit to tape options.
20 FinalCutPro Shortcuts I Can’t Live Without
Logging
COMMAND-8
It's the Log and Capture window. It just is. You'll always find it there.
TAB
To advance from one text field to the next, simply TAB to it, then type. The field is automatically selected and it's an easy way to replace existing text. Press Shift and TAB to backstep. This applies to timecode fields as well.
I and O
Assume you're now viewing your source material, making selections. Press I. That sets your In point. At your Out point press O. Now press
F2
Log the clip and add it to your selected browser bin. If you've asked for a log prompt rather than filling in the clip info fields, you'll get the Log Clip dialog which allows you to name it and comment it. Otherwise it goes right into your logging bin as a redline clip.
Windows and Timeline
Here's some wisdom which applies to any activity in which you aren't fully confident: when you don't know what you're doing, do it neatly. Arrange your Browser, Viewer, Canvas, Timeline, Tools and Audio palettes precisely the way you like them.
Option-Window>Arrange
While not strictly a keyboard command it's the only way I know to store a layout. Hold down the Option key, and use the mouse (ugh) to access the Windows> Arrange menu. Notice two commands "Set Custom Layout 1 and 2". (Without the Option key, these show up as "Use Custom Layout 1, 2"-it's magic!) Choose either. Repeat this process with the other layout if needed.
Shift, Option and Control - U
The fun part comes later, after the assistant, your SO or your cat has completely fouled your custom window arrangements. Merely hit Shift- U to immediately recall your preset Custom Layout 1. Option-U will immediately recall Custom Layout 2.
Command-3
You'll need this frequently. It activates the Timeline window. Practice it.
Shift-T
Need to enlarge your timeline tracks vertically? This command will cycle through your four track size settings-any of which you can customize in the Timeline Settings dialog beforehand. This is far easier than trying to click the little bar chart in the lower left.
Shift-Z
Need to shrink your timeline instantly? This'll do it. If you merely double-tap the Z zoom tool you might be clicking for a while to zoom out. Shift-Z fits your entire sequence into the width of the timeline window in a flash.
Command or Option Plus or Minus
Need to zoom in to enlarge the area around the Playhead? Look below F9 and F10. Command-Plus or Option-Plus will bring you closer in increments. Command/Option-Minus will back you out.
Command-D
which will Deselect All timeline selections. Zooming will now center around the Playhead.
Playback
J-K-L
Have you used it yet or are you still tapping the spacebar? The spacebar yields barely one sixth the playback power available. But turn the page, J-K-L rocks!
Tap L. Forward play. Now tap it again. Doublespeed! Again! Triple speed!
Tap K to stop.
Tap J. Tap it again. And again. Forward and reverse multiple speeds at your fingertips.
But wait, there's more! If you act now...
Press K and keep it down. Add L. You should be hearing a nice slow scrub through your timeline. Release L.
Now press K. Add J. Reverse slow scrub!
Now you can't live without it, can you? Some editors call these their "Steenbeck keys."
Cutting
F6, F7 & F8 and Shift
Target your tracks! Punch F6 and rapidly follow with a V-track number. It'll light the appropriate yellow track target for editing. Likewise, F7 & F8 target your A1 and A2 tracks, to any timeline audio layer you desire.
If you wish to suppress the Video and cut in only audio, press Shift F6 for "No Video target". Shift F7 and Shift F8 suppress audio tracks A1 and A2 respectively.
F9 & F10
The clip shooters! The most important two keys other than J-K-L and I-O are the two splicers-- Insert and Overwrite. They are nicely isolated at the top of the board: F9 and F10.
Use them! Select your clip, set its I-O, Command-3 to the timeline, set your target track if it isn't already, set an In or Out-you don't need both if your clip I-O is defined-and shoot it in with F9 or 10. Insert pushes everything ahead. Overwrite doesn't. This is fast!
Notice how these five function keys line up in a row? They are the Big Five for editing. Target and then shoot your cuts. You'll be at the bar tossing one back in no time.
Live Loop Trimming
This is one of my favorites and it just gets better with faster Apple hardware. It allows you to view and listen to an edit and trim it interactively, with little delay between trims. It involves three keys plus the numeric keypad. The description is long, the execute is short.
You want to trim an edit, so first you must select it. With the timeline window active, you can do that from the keyboard!
V
That's it, justV! Selects the edit point closest to the Playhead. If that's not the edit point you want, why then navigate to it by pressing Arrow keys-each edit point comes up pre-selected.
U
Now tap U to cycle from center select to left to right side select-this is equivalent to setting up for Roll or Ripple trims. If your video and audio is linked (as in a stereo pair) all track edits will be selected simultaneously, and you can do synch ripple trimming. (This works especially well if you have no other tracks spanning the region you want to trim. To select edit points on additional tracks, you have to click the mouse on each while holding down your Command key. Sorry
Keypad Trim by the numbers
With desired ripple or roll edit selection made, tap Plus or Minus on your numeric keypad, followed by the number of frames you wish to trim ahead or back, and press Enter. If you have no cut selected, the Playhead will merely advance or retard the given amount so make certain your edit is selected.
If you punch in more than two numbers FCP will assume you mean seconds and frames-i.e., if you punch in 345 it'll even calculate the number of seconds within the 45 frames and deliver you to 4:15.
Colon (or semicolon for drop-frame format) separators will occur naturally after every two digits, you don't type them.
In keypad trim as in any other method, trim limits will be indicated with a "Media Limit" message in the timeline when you complete the action. Your selected cut will ripple into the future (Plus) or Past (Minus) the amount you indicated.
But wait! There's more, and you must act now! Just tap the \ That is, the "Backslash" key above your Return key. It's the Play Around Playhead" command. Now you'll loop the cut point to review it. You'll hear one iteration of the new cut. Want to hear it continuously? Good! You need to, for Live Loop Trimming.
Control L
Turns the playback looping property on and off-a very handy toggle.
Now press \ for continuous looping around the Playhead at the cut.
And now, while it loops, punch in Plus or Minus values from the keypad. Gauge the effect. When you're happy with the result, tap the spacebar or the K key to stop looping.
Now that's live trimming! With practice, this becomes second nature. And very close to Avid Trim, in case you're looking. It's worth summarizing:
Tap V- select cutpoint
Tap U- select trim side
Plus or Minus and time value
\ Backslash to loop
Repeat Plus or Minus and time value as needed
SpaceBar.
How many times did you touch the mouse? Less than before? That's the goal.
E
I simply couldn't neglect the elegant E key-for Extend Edit. You can make a centered cut selection, then move the Playhead to wherever you like and press E- the selected cutpoint loyally Rolls to your Playhead-assuming underlying media is available. Works the same way as Avid's.
