
Detailed Final Cut Pro Setup Instructions…please read through, it will save yo’ ass later.
On to the fun...
Before you begin ripping away at Final Cut, there are a few preparatory things you should take care of:
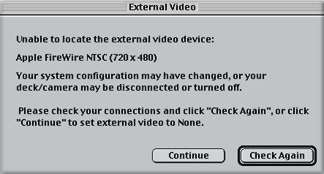
1. Make sure DV Deck/Camera is powered on. If not used for a while, it may power down into a sleep mode. When you start up FCP, you may get this message. If you do, chances are that the deck is not powered on. To see what you are doing in FCP, you need this deck/camera and an NTSC monitor (connected to your deck/camera using the analog outputs (RCA or y/c cables) switched on. This is also how you will be outputting other tape formats (VHS, HI8, SVHS, even Beta), should you wish to do so. Simply connect the destination deck between the DV deck/camera and the NTSC monitor.
2. To monitor audio, simply patch audio out of your deck/camera to the NTSC monitor. At some times you may also get audio from the Mac speakers. If it bothers you, you can disable it in preferences (later). If not ignore it. If you are sending Video out to the Firewire connection to monitor, the audio goes out to Firewire as well.
A note on configuring drives:
It's really much less complicated than folks tend to think. The video footage on your DV tape isn't like VHS video. It's a digital file. So when you capture it, you're just transferring the file from the tape to the drive. That's why we call it LOSSLESS, because it's an exact copy of the file on the tape. Why is this important? Because when you play a clip in the FCP timeline (more later), the video file has to be read from a hard drive quickly, unlike physical tape which crosses a tape head at real-time.
Now for common FCP usage, there are two kinds of DV files; files you captured using the Firewire from deck/camera and files you create every time you render anything, i.e. transitions, filters, etc. The former are called (and go into) "Capture" and the latter are called (and go into) "Render". Audio and Video captured from Firewire are considered one file. Anything rendered is also a file.
Start up the whole system
1. When the Mac is finished booting, you will be looking at the desktop. To start FCP, double click on the Final Cut Pro Icon.

When you start FCP, it will always open the last project that was open on the machine, or an untitled project if this is your first time or you have thrown out the preferences. Chances are when FCP is finished loading, there will be a project open and it may not be the project you want to work on. If not, just go the File Menu and select Close Project. You can really screw up your life by not keeping your eye on the ball, because if you just begin working and save, you may change someone else's work. Also remember that more than one project can be open at a time. If you don't want to work with a project that opens at start up, close it or you may accidentally change and save it later.

2. When FCP is completely loaded, several windows should open up. More than likely, a previous project will be open up as well, so immediately close any other project that may have opened, by going to the File menu and selecting Close Project. When there is no longer any project showing in the browser window (only the effects tab), you must set your Preferences. Unlike many applications, where you can happily work without ever altering the default preferences, FCP needs you to set the preferences correctly in order to work. FCP also has the annoying (or convenient, depending on your workstation needs) tendency to retain the preferences from the last project that was opened. This means that even if you have the right project open, FCP could do the wrong things to it. Although FCP 2.0 has included some enhancements that make preferences and A/V settings easier, you must still make the correct settings or FCP will not work right.
EVERYTIME you start to work, go to Preferences and check to make sure that they are set the way that you want them. To do this, first go to Preferences in the Edit menu.
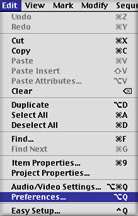
A window will come up that is divided into 5 tabs along the top. These are your Application Preferences. You must visit each of them, although it is conceivable that you may never have to change any of them. Just do it to make sure until you have it down cold, OK ? 99% of FCP problems are settings-related.
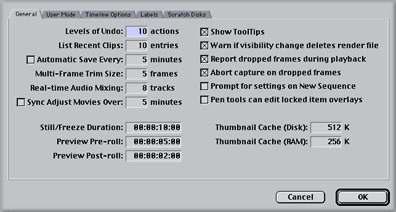
The first tab is for General Settings. You may want to disable AutoSave, as there have been rare reports of corrupted files. Be safe and manually save all the time. If you are using a Canon camera other than the GL-1, you may need to enable the Sync Adjust Movies to compensate for an audio sync issue related to those cameras. IMPORTANT: DO NOT ENABLE THE SYNC ADJUST MOVIES IF YOU BELIEVE THERE ARE TIMECODE BREAKS ON YOUR DV TAPES. The default setting for Sync Adjust Movies is on. It should be turned off if you are using anything other than Canon cameras, excepting of course the GL-1. Leave "Report Playback Drops" and "Abort Capture Drops" enabled. This will be the only way you know you are dropping frames. If your system is dropping frames, you need to know this so that you can fix the problem. DROPPED FRAMES ARE NOT ACCEPTABLE!!! Disabling them is like taking the batteries out of a smoke alarm. Be careful with the other settings on this tab and reference them in the Manual and FCP QuickStart Guide where they are explained in-depth

The second tab is for User Mode. The User Modes limit some of the features available to the project and leave a workstation that is easier to use for the simpler tasks of field logging and rough cutting. For the time being, select Standard.
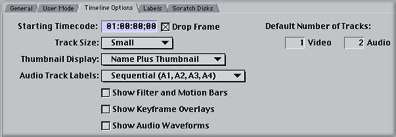
The third tab is for Timeline Settings. This preference allows you to customize certain features of the sequence timeline. You also have the option of having the timeline start with a time value other than 01:00:00:00, which can be a useful function in certain circumstances when using the Editing to Tape function.
The fourth tab is for assigning color values for status indicators in the timeline. This is less critical, but you can customize these when it becomes necessary.
The fifth tab is absolutely critical. It is called the Scratch Disk settings and it is where you tell FCP where you want to save those enormous Capture and Render Files we were just discussing above. No matter how streamlined FCP makes the process of starting a project, this Scratch Disk Preference will always remain a critical responsibility of the user. You will not take it seriously until you lose a lot of files one day and have to completely redo a finished project.
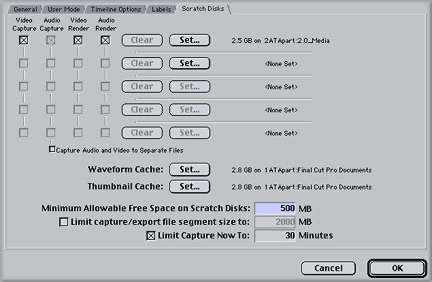
To correctly set your Scratch Disk Preferences:
Click Set on the topmost of the five Clear/Set combination lines. You will receive a dialog box asking you to select the appropriate folder/drive. Navigate the dialog box until you are looking at the desktop, then double click your Capture/Render drive.
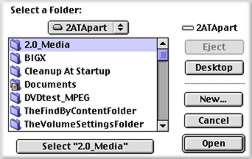
When you are inside your target capture/render drive, select "new folder". Enter whatever you wish to name your destination followed by "_media ".
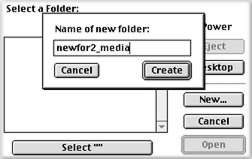
Hit OK, then hit "Select".
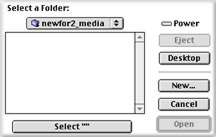
After you hit "Select", you'll return to the Preferences. Look at the information next to the Set button. Make sure that you named everything in this capture/render directory with distinctly different names, using the underscore if necessary(the directory is the exact path to the capture and render folders starting at the desktop level, the "2ATApart:newfor2_media" following "2.5 GB on..." in the below picture.)

FCP can confuse folder and drive names quite easily, so use a naming convention that makes sense to you but which is easy for FCP to keep organized. For instance, the drive or folder names "Video 1" and "video 2" are lousy choices; the difference between them can escape FCP. "#1Video" and "#2Video" might be better choices. "Fred" and "Sam" would be even better, if you can keep them organized in your own head.
Click in the check boxes for Video, Video Render, Audio and Audio Render. If you have other drives you wish to dedicate as Capture/Render drives, follow the same process for each, making sure to leave the start-up drive unallocated.
You may be asking yourself right now, "Why do I want to create a media folder for the project? FCP will create a "Capture folder" on the drive I select, so why bother with further delegating it into a specific folder?" The answer is Media Management, my friend. The secret to a happy Media Drive is keeping it organized and tidy. If you simply select the Media Drive as the assigned Scratch Disk, FCP will create three folders on that drive, the Capture, Render and Audio Render folders. Then, every time you create a project, it will create a project-specific folder in each of these folders.
|
|
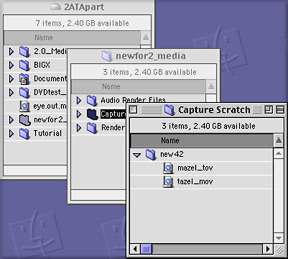
Of course there is intrinsically nothing wrong with that. That's what FCP was designed to do, and it is a vastly improved system compared to the previous version's handling of media. However, there is a potential danger for people who tend to be sloppy with drives. Pretty soon, you may find yourself with generic Capture and Render folders on every drive on your system. And inside every one of these generic folders will be project media folders with different media from different sessions. Tidiness is important. Although the new Media Management tools will allow you to correct this situation easily enough, the best idea is to avoid such a situation in the first place
So every time you begin work with FCP, go to the Scratch Disk preferences and make sure that the folder you created for your media on the Media drive is selected. Doing this will keep your Capture, Render and Audio Render folders grouped together in one location and also ensure that in each, the single correct media folder for your projects is in place.
Version 2.0 of Final Cut Pro contains much stronger Media Management tools than previous versions, but the need to understand and control your media files is just as necessary as ever. Now FCP will let you eliminate media from your drives to make room should you need it. Your capabilities in MID-project are fantastic, but the ability to juggle multiple projects on the same drive and clean up the system after you are finished depends on how carefully you construct your projects at the beginning.
Take responsibility for your own Media Management. Never ask a desktop computer to do a job you can do better.
Make certain to disable capturing Audio and Video to Separate Files.
Another important setting for this preference menu is the "Minimum Allowable Free Space". This is the 10% buffer to which we referred earlier in the article. "Minimum" should be set to avoid getting poor drive performance and possibly dropped frames as a result of drive fragmentation. Drive performance degrades dramatically past a certain point of drive capacity. In the old days, 85% capacity of a drive was generally considered the limit. This meant that on a ten gig drive, you could expect massive drive slow down after writing 8.5 gigs to it. Some really neurotic people (like me!!!) used 75%.
This is not a written-in-stone policy and there are a jillion variables that affect whether or not a drive becomes massively fragmented after a certain capacity. I generally set mine at 1 gig (or 1000mb). A 1 gig buffer leaves plenty of space to avoid fragmentation and is realistically only burning about 5 minutes of capture time. Not too bad. I would recommend that you choose a number that is either 10% of the total drive size or 1 gig, whichever is less. That should keep it happy.
"Maximum Size for Capture/Export" should be left unchecked unless you are attempting something in particular that requires specific limitations on file sizes and/or you know what you are doing. This will not affect your system's performance under generic capture and playback situations. If you are going to use Capture Now (and not the preferable method of logging your clips), you can also enter a maximum limit to the length of the capture. Hit OK in the bottom right hand corner.
If that weren't enough:
Next you need to set the Audio/Video Settings. You can actually do what is called an Easy Setup to speed up your process in future projects. But you need to do an initial check to make sure your system is set up correctly. Then you can assign this as your Easy Setup, using it every time you work and easily adapting your system when your hardware or media situation changes. To get to the Audio/Video Settings, go to Edit>Audio/Video Settings(N).
This will bring up the A/V Settings
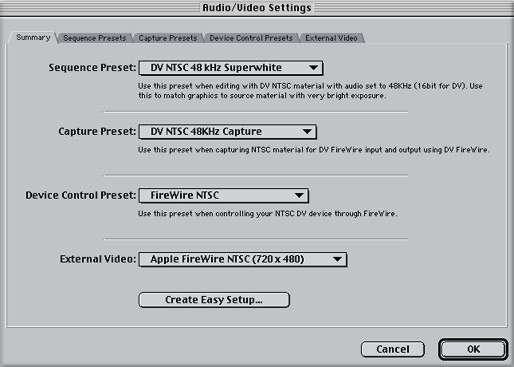
The first tab displays the settings currently active in the other four tabs and lets you set up Easy Setup settings. We'll come back to this tab after configuring the other four tabs. Click on the Sequence Presets Tab
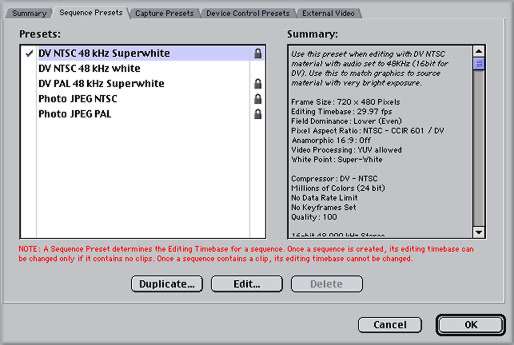
You will want to set up this preset depending on what your own needs are. FCP requires that your settings for Sequences and Capture match, and that both match the actual DV media you capture from tape. For Firewire, the DV NTSC 48K Superwhite preset should be fine here. But most DV cameras allow you to record Audio in your camera at either 32K or 48K. It is IMPERATIVE that you know which you have used, and that you set it correctly here.
A note on audio sample rates
As much as we'd like it to be intuitive and human, FCP really is kind of a stupid machine. It can only do exactly what we tell it. It does not evaluate the data we give it, it simply re-produces that data according to how we have told it the data should be evaluated. If you tell FCP that the audio on your DV tape was recorded at 48k, when it was really recorded at 32k, it will process the audio at the wrong rate. Incorrect audio settings are the main source of out-of-sync audio and video on the timeline.
If your audio goes slowly out of sync as the playhead moves down the timeline, your settings were probably wrong at some point. It is important that you inform FCP what rate the audio was recorded at and that you keep the rates consistent across the application. This means that 48k audio should be set at 48k in the capture settings and sequence settings. Not all cameras record at 48k; the Sony VX1000 only records at 32k, for instance. If using this camera, you must set up your project accordingly.
If you need a different preset from those provided, simply Duplicate the DV NTSC 48K Superwhite preset, select the copy, hit edit and change whatever you need to. Be sure to name it something other than Copy, since it no longer IS a copy. Consult the FCP User Manual for more details on what the rest of the settings imply. If you are using 48K audio, the Summary on the right hand side of the Tab should read like this.
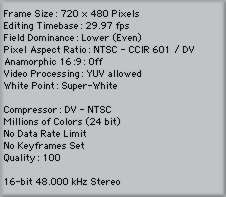
Click the next tab to set the Capture Settings.
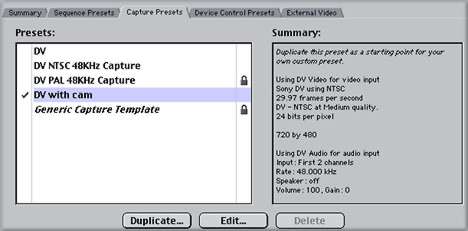
As stated above, this Tab needs to accurately reflect the media you will capture through Firewire. The DV preset should be mostly correct, but you may want to Duplicate it and then hit Edit on the copy correctly configure it for your system. Remember that you will need to correctly set the Audio Sample Rate here as well. If you are using 48K, then your settings should look like this in the Summary window.

With respect to Sequence and Capture settings, be advised that you will be miserable if you do not nail this down. If you capture media and then see the red render line when you place it in the timeline, chances are you didn't get these settings correct.
The next Tab you need to address is the Device Control Tab.

Device Control allows you to control, or not control, a Device like a camera or deck. Since you will be using Firewire, whether you are using a deck/camera or a DV converter, you need to check this tab. If you are using a DV converter, you need to select the Non-Controllable Device. If you do not, FCP will try and receive Timecode Data from the Firewire stream that is not there, resulting in failed captures. If you are using a deck or camera, you need to decide between Apple Firewire or Firewire Basic for Protocol (consult Apple's website to see which is appropriate). It is suggested that you set the deck Pre-Roll to 5 seconds and the handles to 15 frames. Consult the Manual for the reasoning behind these settings. The summary should look like this with variations based on your deck or camera situation.
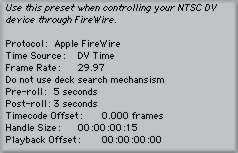
Finally, you need to check the last tab for External Video.
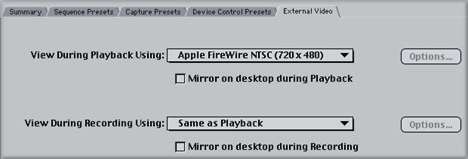
This tab lets you decide how you will monitor the video as you edit. You can decide to watch playback through the Firewire to a video monitor or set it to None for just viewing on-screen. You also tell FCP whether or not to view on your computer monitor while playing back, called mirroring, or recording to tape. Until you have gotten acceptable performance with your system, leave 'mirroring' off. Older systems or systems which are not optimally configured may drop frames if forced to display the video in both places.
Once you have completed the four tabs, return to the first tab, Summary, and hit the Easy Setup. Now you will take your optimized settings and save them under a preset name.
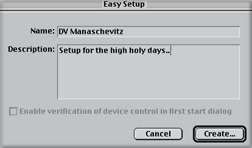
Give the Easy Setup a name, and give it a description. Click Create and save the preset in the Custom Settings folder.
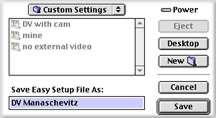
Now when the time comes to work, you can simply choose the preset instead of going through all the tabs individually.
Save Early, Save Often
Finally, its time to name your project and save it appropriately. Remember that we have turned off AutoSave, so any crashes will lose anything you haven't saved. Also remember that the Preferences are not saved with the project file, so you will have to recheck them when you start back up. Go to the File menu and select New Project (unless of course you already have a project you are working on, in which case you would merely open that project). On doing so, any number of the windows shown below will appear on screen.
This project you have opened will have the name Untitled 1 assigned to it by FCP. That name is unacceptable. Do not let me catch you with Untitled anything. Name your files according to what they are. To name your project, select Save Project As from the File menu.
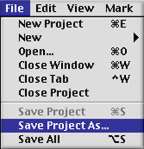
A dialog box will immediately pop up asking you to name the damned thing. FOLLOW THE FOLLOWING METHOD EXACTLY !!! If you do not save your files in the appropriate locations, you will lose everything, hours and hours of work. Save your project files on the desktop and AT LEAST one MAC FORMATTED zip disk. This is REALLY important, Follow the order of these steps exactly...
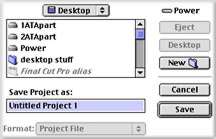
When the Save as Dialog Box appears, do not name your project first. First, hit the Desktop button so that you will be saving it to your Start Up Drive, then select New Folder. It is very important that you not save your project to the same drive that your media is saved to and instead save it to the same drive that your System folder and Applications live on. You will be asked to name the new folder. Name it with your project's name and the word "folder". Remember, unrecognizable stuff is WAY more likely to disappear.

Hit Create and you will return to the Save Project dialog box. Change Untitled to something relevant and then hit OK.
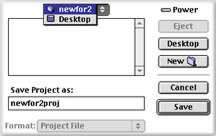
Your project file will now be saved in YOUR folder on the desktop.
Backing up your project periodically is an incredibly important step that you should be doing. You are investing incredible amounts of time and effort and it all boils down to one fragile project file. If that project file goes belly up, your work could be gone for good. That will not be as catastrophic if you are regularly backing up and archiving your project files to another location. I suggest two locations. Have a copy of the project file stored in a separate folder on your hard drive and also copy it out to your zip disk.
To copy them to your zip disks periodically, simply pop in your zip and drag the project folder onto it. Then re-name the copied folder on the zip with the date and time. This process is called sequential back up, because each time you back up your project files to the zip disk (or other folder on your drive), you are creating a version of the project up to the time you copied it. If you ever decide you went a wrong direction with your editing several days back, you can easily return to your previous version. As you copy these project folders from your desktop to the zip disk, you will rename the folder with the date or a number identifying that the project in that folder was current on that date. Sequential Backup is standard in an industry that can not be subject to the whims of a single corruptible project file.
(note-Remember never to run a FCP project from a zip disk. ALWAYS REMOVE YOUR ZIP FROM THE MAC BEFORE WORKING IN FCP.)
Ok, now the last setting and you're home free. Go to the Edit drop down menu and select Project Properties. The following box will open.
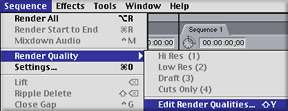
Without altering anything, hit Edit Render Qualities. The next box that opens should look like this. Adjust the settings exactly as shown. The time will come when you can adjust these to benefit and streamline your process, but for now they will keep you from dropping frames.
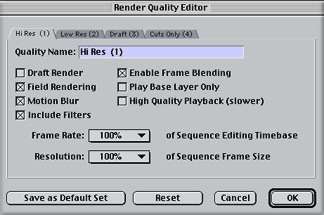
Hit OK for this window, OK to close the Project Properties window and you have finished your settings. Now you can work reasonably assured that you are not going to drop frames.