|
Flash Exercises:
|
|
Making Buttons in Flash
One of the most powerful features of Flash is the interactivity you can
build into your Web site. The button symbol is something you'll use
often. Buttons can be as simple or as complex as you want. Buttons can
contain movies and actions inside.
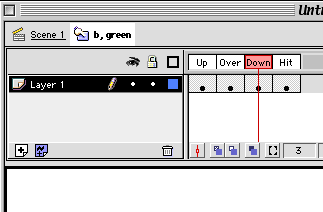
Buttons are actually interactive movies consisting of four frames. The
first three frames define three states of the button, while the fourth
frame defines the button that is "hot." The four frames are:
1. Up -- what button looks like in inactive state, when the pointer is
not over the button;
2. Over -- what the button looks like when the pointer is over it;
3. Down – what the button looks like when the mouse is clicked on
it; and
4. Hit -- the area that is “hot” that will trigger the button
states.
Exercise to build a simple button:
- From the Insert menu, choose New Symbol. In the Symbol
Properties window that opens, choose Button as the Behavior type. Name
it: b, simple button. Click OK.
- This opens up the symbol editing window.

You will see 4 labeled frames in the Layers and Timeline area. These
frames represent the 4 states for your button: Up, Over, Down, and Hit.
This is where you will create the artwork for the different states for
your button.
- Click in the “Up” state frame.
- On the stage, draw a blue filled circle. The Up state is done.
- To create the "Over", "Down" and "Hit"
states, select each frame (state) and from the Insert menu choose
Keyframe. This will put the last keyframe (Up state frame) in
the selected frame. Then you can go back to each new frame and change
the button.
- We want the "Over" state of the button to look like the
"Up" state except with a different fill color.
- Select the "Over" state frame. If you click directly on
the frame, it will select all objects in that frame. If you click over
the frame, on the state label, it will go to the correct frame, but
not select the objects in that frame. If the object is not selected,
choose the selection arrow and select the blue filled circle on the
“Over” state. While it is selected, choose a new color by
the fill bucket to change the fill color.
- Now select the "Down" state frame. Let's make the Down
state a little different. Change the fill color to yellow the same way
as in the Over state. Add some little dashes like radiating rays from
the sun around the circle.
- Let's leave the "Hit" state the way it is.
- Click on the Scene 1 icon in the upper left hand corner of the work
area.
- If the Library window is not open, select Window/Library. (The key
command will be indicated in the pull-down menu, if you'd rather
use keys than the pull-down menus all the time.)
- The simple button you made shows up in the Library list.
- Select the button and the "Up" state of the button will
appear in the upper portion of the Library window along with a right
pointing arrow. Click this right pointing arrow and you'll see all four
states of the button played.
- Drag this button onto your stage.
- To see your button in action, from the Control menu, select
Enable Simple Buttons. Rollover your button and click on it.
It should turn a different color when you roll over it, and turn into
a yellow sun when you click on it.
- See Example 1 in the Flash
Examples section of this tutorial for the finished product.
Exercise to create a button to perform an action:
One of the most common button actions is to call up a different URL.
We'll put this action on the button we just made and placed on the
stage.
- From the Control menu turn off Enable Simple Buttons
so you can select the button on the stage. (Enable Simple Buttons will
not show you movies in keyframes.)
- From the Window menu, choose Actions. This will open
up the Object Actions window, one of the most powerful tools in Flash
5. Check and see that it is set on Normal mode and not Expert Mode by
clicking on the arrow in the upper right corner. (Normal mode gives
you clues and blanks to fill in with the proper syntax. Expert mode
allows you to type in your own syntax.) For our purposes, we will choose
Basic Actions from the list on the left hand side. Scroll through the
list and select “Get URL”.Either double click on it, or drag
it over to the right hand side. It will show up with the proper syntax,
and an area to fill in on the bottom of the Object Actions window. (This
action defaults to the “on release” action. If you want to
change this, click on that line in the Object Actions window, and you'll
see a new set of options for that line on the bottom.) With "Get
URL" selected, Flash asks you for the URL you want this button
to direct the user to. If you don't have a URL to use, type in this
one: http://www.utexas.edu/
- Now you're ready to test your button. There are several ways to do
this:
- from the Control menu, choose Test Movie or
- from the File menu, choose Publish Preview/HTML or
- from the File menu, choose Publish Preview/Flash.
Test the button by rolling over it and clicking on it.
- See Example 2 in the Flash
Examples section of this tutorial for the finished product.
Exercise to create a fancier button:
- Select the b, simple button in the Library window. Click on the Options
arrow and from the drop-down menu select Duplicate. Name this button
'copy b, movie button'. Leave the behavior as Button. Click OK.
- Create a movie to place in the Down state of the button.
- First, let's copy the sun and rays from the Down state of the simple
button.
 Click on the Symbols icon in the upper right hand corner of the stage,
scroll down and choose your old button. The symbol editor opens.
 - Click on the Down frame, select the sun and rays, and from the Edit
menu, choose Copy.
- From the Insert menu, choose New Symbol. Select Movie
Clip and name it 'm,sunny'. Click OK. The symbol editor is now open.
- From the Edit menu, choose Paste in Place. You should
see your sun from the “Down” state of the simple button.
- From the Insert menu, choose Keyframes at frame 5
and frame 10.
- Go to frame 5. Scale the sun up a little (i.e., make the image bigger).
From the Modify menu, choose Transform
and then Scale. Grab one of the square handles and make the
image a little bigger. Now lets make a tween between keyframe
1 and 5, and 5 and 10.
- Click on a frame between 1 and 5. The area on the Timeline turns
black.
- Now open the Frames panel. From the Window menu, choose Panels
and then Frame. Choose Shape Tweening from the pull-down menu.
(Shape tweening is for objects that have not been turned into symbols
or grouped together. You can tell if it's a raw graphic by the selection.
It will select and fill the object with black and white noise if its
still raw. Grouped objects and symbols will have a bounding box instead.
The shape tween is represented by a light green background with a
solid line arrow on top. Dashed lines means something is not right.)
- The tween should make a smooth upward scale between frame 1 and
5. Do the same thing between frame 5 and 10.
Let's make this even more fun.
- Add a layer above the scaling sun layer. Name it 'spiral.' Double-click
on the Layer to change the layer name.
- Insert a keyframe on the first frame.
- Select the first frame on the spiral layer and draw a darker yellow
or orange spiral on top of the sun.
- Select the spiral and make it a symbol by choosing Convert to Symbol
from the Insert menu. Name it 'm,spiral movie clip.' The behavior
is movie clip.
- Create a Keyframe in frame 10.
- Select frame 10 which still contains the unconverted graphic. Select
the image, delete it and drag the spiral symbol from the Library window
into its place. You can use the arrow keys to line up the center crosshairs.
It should be in registration with the first one on the first frame.
- Let's make the spiral rotate one complete revolution for 10 frames.
Select the area between frames 1 and 10 and open the Frame panel (from
the Window menu, chooose Panels and then Frame).
In the Tweening box select Motion. In Motion Tweening, you can indicate
the direction of the Rotation. Select CCW for counter-clockwise. In
the "times" box, put 1 for 1 revolution. Motion tweens work
on symbols. The tween on the Timeline will look blue, with a solid line
arrow.
- Create a new layer and move it to the top. Call it 'actions.'
- On the actions layer, select frame 10 and insert a keyframe by choosing
Keyframe from the Insert menu.
- Choose Window/Actions. The Frame Actions window opens.
- Select Basic Actions and “Go To." It will be an action on
this frame sending it to a frame number or label. It defaults to frame
1 which is fine in this case. Now this movie will loop endlessly. (The
timelines in movies are independent of the Timeline on the main stage,
so frame 1 is unique to this movie.)
Putting the movie into the button
- Click on the symbols icon in the upper right hand corner and select
'copy b, movie button.' You are still in the symbol editor, but you
are back in the duplicate of the first button you made.
- Go to the Down state (frame) and delete the sun graphic.
- From the library, drag in the copy b, movie button you just finished
making. You can line up the center crosshairs with the arrow keys.
- Go back to Scene 1 (upper left). Now your movie button has an animated
down state.
- Test your movie.
- See Example 3 in the Flash
Examples section of this tutorial for the finished product.
Congratulations, you have made a button with a movie in it!
|

