|
Flash Exercises:
|
|
Using Layers in Flash
Layers are like clear sheets of acetate or glass. Layers can be stacked
on top of each other. Each layer can have its own artwork, sound or action
on it. Use as many layers as you need to keep everything separate and
organized. Be consistent with the way you order and name layers, so that
if you have to put the .fla away and work on it down the road, you won't
be totally lost. This is a good practice to adopt. Suggested layer order
and layer names are:
1. Actions --- any frame actions assigned can all be here.
2. Labels --- Name keyframes that have actions
3. Sounds --- Any sounds can be placed in keyframes here.
4. Object 1 (whatever you have on this layer)
5. Background
Name layers with short meaningful names that you will be able to identify
at a glance. Such as "red ball bounce," or "button home."
These aren't read by Flash, so they just have to have meaning to you.
NOTE: You can have as many layers as you want (or as your system
can handle). Layers do not add to file size.
Creating New Layers 
There are several ways to create a new layer:
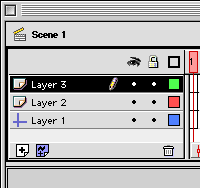
- Click on the “+” button in the lower left corner of the
Timeline.

- From the Insert menu, choose Layer.
- Create a guide layer by choosing the icon next to the "+"
with the zigzag.
 A guide layer is used to help in drawing. Any
layer can be made into a guide layer. The artwork appears in your work
area, but not in the published movie. When you see this icon next to
the layer name, then it is a guide layer.
- Right–click (Windows) or Control+Click (Macintosh) on an existing
layer and choose Insert Layer from the dropdown menu.
Layer Attributes
You can change the order of the layers by dragging them up or down
in the Timeline.
The icons across the top of the Timeline control different attributes
of the layers.
-
 The first changes the visibility of the layer to Off or On. This is
helpful if you don't need to see that layer to work on a different
layer. Even if you have the visibility of the layer turned Off, it will
still show up in the published movie. If you want the layer to be visible,
but not show up in the published movie, change the layer to a guide
layer. The page icon on the layer will then change to a “crosshair
shape”
 The Lock icon
locks the layer so that you can't make changes on it. The Lock icon
locks the layer so that you can't make changes on it. The Box will
change whatever artwork is on the layer into an outline. It will show
up as the artwork, not as an outline in the movie. The Box will
change whatever artwork is on the layer into an outline. It will show
up as the artwork, not as an outline in the movie.
You can also change the height of the layer. This may be necessary if
you have a sound file on a frame and you want to see the whole sound wave
representation. To change the height, Control+Click on the layer (Macintosh)
or right-click (Windows) and choose Properties. Adjust the layer height
in the Layer Height box at the bottom of the menu box.
Exercise:
- Create an object on a layer, click on the eye and test
movie.
You should see that even though the layer is invisible, the object shows
up.
- Change the object to an outline, and do the same thing. It should look
the same.
- Change the layer type to a guide and test. Even though the object is visible,
it won't show up in the test movie.
TOP
|


