|
Flash Exercises:
|
|
Using Color in Flash
There are several ways to select color with Flash. The Swatches panel
displays the 216 Web safe colors and also stores custom mixed colors created
by the Mixer panel. To open the Swatches and Mixer panel, from the Windows
menu choose Panels and then Swatches and then Mixer.
When working with colors in Flash, you may want to organize the Swatches,
Mixer and Fill panels into one window. These three panels are used together
very often with colors, and you can save and recall this panel layout.
Adding a New Color to the Swatches Panel
- Click on the Mixer panel tab. Select the color swatch next to the
bucket symbol. This is the Fill color.
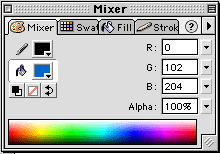
Select another color from the drop down swatches menu or by using the
sliders from the RGB sliders on the right. These sliders can be switched
from RGB (Red, Green, Blue) to HSL (Hue, Saturation, Luminance) or HEX
(Hexidecimal) using the left pointing arrow on the Mixer panel.
- Adjust the transparency of the new color with the Alpha text box or
slider.
- When the color and transparency is set, select Add Swatch from the
right pointing arrow on the Mixer panel.
- Switch to the Swatches panel. The color you created is at the bottom
of the color swatches. Now you have a custom swatch palette that you
can save and call into other Flash sites.
Saving a Custom Swatches Panel
Select the Swatches panel. Use the pull-down menu from the top right arrow
and choose Save Colors. Save your swatches in your chosen directory.
Adding a New Gradient Fill
Let's make a new gradient that has one solid color and one transparent
color.
- From the Swatches panel, choose the green radial gradient type. (You
can change the type of gradient later.)
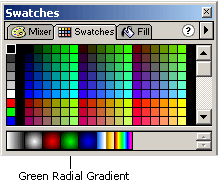
- From the upper right arrow choose Duplicate Swatch.
- Switch to the Fill panel. Click on one of the color boxes under the
bar.

That color pops into the swatch box on the right. Select and hold this
swatch box and the rest of the swatch colors will appear. Without letting
go, select the new color you previously made and saved. It appears in
the color box under the bar, and appears in the bar blended with the
other color.
- Now select the other color and choose a new one. You can change the
gradient type from the pull-down menu menu above the bar.
- Change the gradient type to Linear.
- Now look at your swatches and you'll see the new gradient you
made at the end of the gradients.
- Gradient color swatches can only be used in fills. Transparent fills
can only be applied to new objects. They will not replace a fill already
there. You will have to select and delete the fill before refilling
with the transparent color. This might have to be a two-step process.
If there is no stroke on your object, add a temporary one with the inkwell
tool. Use that to define the area to be filled, then you can delete
the stroke again.
Modifying the gradient's size, position and rotation inside of a
filled object.
- Make a shape and fill it with your newly created gradient.
- Select the bucket tool on the Toolbox. On the bottom of the Toolbox,
click on the Transform Fill icon.
 Click
on your filled shape on the stage. Click
on your filled shape on the stage.
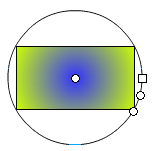
A center point appears in the center of the shape and with a Radial
fill a circular transform modifier surrounds the shape. The square handle
is an adjustment handle. Linear and Bitmap fills will a display a center
point and two vertical lines on either side of the shape. On the right
line, the square adjustment handle appears.
- The Transform Fill handles allow you to change the size, position
and rotation of the gradient fill inside the object. When you drag from
the center point, the position of the fill will move. The square on
the side changes the width, the circle directly below controls scale,
and the other circle below that one controls the rotation of the fill.
The mouse pointer will change when hovering over one of the handles
to indicate the function. Try this with a linear fill to see the difference.
In a linear fill, you can modify the same properties as well as skew
or slant by dragging from one of the corners.
Bitmap Fills
In the Fill panel, choose Bitmap from the Fill Menu. Click on a bitmap
that appears in the Fill panel. You can modify a Bitmap fill the same
as a Linear fill.
TOP
|
